It’s that time of year when Apple run their World Wide Developers Conference (WWDC) and announce their roadmap for core software platforms such as macOS, iOS/iPadOS as well as WatchOS and VisionOS.
There was a lot to unpack so I’ve summarised the top 5 most impactful announcements from Apple below.
Major visual changes with Liquid Glass
Why it matters: Liquid Glass represents a universal design across all Apple platforms, bringing a consistency and familiarity to the user experience no matter which device is being used. Whilst UI changes tend to sit squarely in the personal preference category, Apple have clearly focused on this visual refresh as a significant development at WWDC25 (learn more).
New filesystem and windowing on iPadOS allows for genuine multi-tasking
Why it matters: Addressing one of the biggest complaints of iPad superusers, Apple has borrowed heavily from macOS to supercharge the filesystem and in particular, made working with mutiple app windows significantly easier. These changes will certainly tempt some Apple fans to leave their Mac behind and make their iPad the primary daily device of choice (learn more).
Renaming of all OS versions – aligning to the calendar year of release date
Why it matters: With the maturation of iPhone, iPad and Apple Watch in particular, it was becoming increasingly confusing to align the hardware model with the OS version e.g. an iPhone 16 Pro running iOS18. With this decision, all of Apple’s OS editions across all hardware will ‘reset’ to the calendar year of release as of 2026, meaning we will see the announcement of macOS 26, iOS 26, iPadOS 26, WatchOS 26 and VisionOS 26. Simple, right? (learn more).
macOS 26 (Tahoe) signals end of support for Intel Chipsets in Mac
Why it matters: Similar to Microsoft’s move to no longer support Windows 10, Apple is bringing the curtains down on feature updates to Intel based Macs (2019-20 vintage) with macOS 26 (however security updates will be provided for a further three years). This represents an important juncture and should be triggering refresh considerations for organisations still running Intel chipset Macs (learn more).
Apple Intelligence Update
Why it matters: Whilst Apple announced a slew of updates under the broader category of Apple Intelligence (e.g. live translations in Messages, Phones, FaceTime; improved Visual Intelligence with context aware prompts) it was most notable that the long talked about updates to a smarter Siri were delayed once again. Citing the need to hit a high quality bar before release, Apple indicated it would be available in ‘the coming year’, raising questions on whether Apple is lagging further behind competitors in the AI space (learn more).
Bonus Techie Highlight: Device Management Migration and Authenticated Guest Mode
Why it matters: Often the major highlights from WWDC overshadow some of the more technical improvements being made by Apple. The introduction of authenticated guest mode allows users to quickly sign into a Mac with their organisational credentials (think Microsoft/Okta) or even using an NFC key stored in their iPhone wallet. This level of enterprise integration with Mac will help secure further credibility for macOS in larger organisations and the Device Management Migration announcements mean system administrators can more easily migrate devices from one MDM to another (learn more).
Apple have concluded their annual WWDC event and there was, as always, a lot to take in. For those short of time, the video above summarising 18 things is worth a watch and I’m going to attempt to unpack a few of the other features in more detail below in terms of their relevance for education or commercial customers. I’ll have separate sections for Apple’s take on Artificial Intelligence (they’re labelling it Apple Intelligence) as well as a section on Privacy and Security (given Apple’s historically strong focus in these areas) but first a few hyperlinks into the post below for quicker navigation:
With that done, I want to share a few key take away thoughts that have stuck out to me.
Firstly, it’s evident to me that Apple are looking to move their Vision Pro headset beyond a consumer product and into something targeted at Enterprise and Education customers as it will now have enrolment and MDM management features on par with other Apple devices. This is a logical extension for me given we have seen Microsoft attempt to do this with HoloLens 2 and Meta with the Oculus/Quest AR headsets as well. Whilst these devices remain expensive, the developer community will no doubt welcome the opportunity to build industry specific applications for the Vision Pro, and IT managers will feel more comfortable onboarding these onto their networks if they can be managed and updated centrally from their MDM of choice. I would not be surprised at all to see a world class educational app debut for the Vision Pro in the coming months, showcasing the best of the hardware and software that Apple have created.
Secondly, it’s evident Apple is continuing their long support of education with some additional features coming to SchoolWork and Assessment Mode. SchoolWork looks like it will benefit from the AI enhancements (see below for more) that are landing across many EduTech offerings now, allowing teachers to quickly see trends in student homework, set personalised practice sets and even auto-grade assessments more quickly. Assessment Mode has been extended and developers will now be able to leverage “multi app” functionality which will mean use of approved secondary apps to students during assessment e.g. calculator support, whilst the rest of the device is locked down for the test:
Whilst a native calculator app on the iPad has been a long time coming, this new one (AI powered) can be controlled via your MDM of choice during assessment mode. This means that ahead of high stakes assessment the more powerful features such as scientific mode and the newly announced “Math Notes” can be disabled if the teacher or school wishes.
Lastly, it appears that Apple are transitioning away from the terminology of “Apple ID” and moving to “Apple Accounts” – although the documentation does not appear to have caught up yet (Managed Apple IDs for Apple devices – Apple Support (AU)). There was a renewed push for Managed Apple Accounts at WWDC24 (What’s new in device management – WWDC24 – Videos – Apple Developer) and some announcements on how to migrate personal Apple ID/Accounts into a managed environment (more on this below).
I expect the ability to easily migrate personal Apple ID/Accounts that use an education/work email address into a managed Apple ID/Account will be a big deal for IT Admins who wish to control those more effectively.
As other commentators have pointed out, Apple waited a while to announce their take on AI and, when they did, used the phrase Apple Intelligence instead of Artificial Intelligence, so I’ll drop a few thoughts below.
Apple Intelligence (AI)
The Writing Tools (Rewrite / Proofreading) will be welcomed by teachers and students who struggle with formal writing and this highlights the speed with which Generative AI is being added into more products to accelerate content creation and improve readability (see here on other thoughts I’ve shared). There are, of course, some cautions that come with this: how do educators know how much of what a student writes is their own content vs AI generated? Are students grasping key concepts of punctuation or are they totally reliant on a tool to check / correct for them?
This touches on the larger question of the extent to which technology reduces the need for individuals to ‘know’ things (are times tables critical to memorise if you have access to a calculator all the time?) but also highlights the need for schools and organisations to have their own AI Policy of when and how to use AI tools (our engagements with customers show that over 75% of users are already leveraging AI in day to day work, even though less than 40% had an AI policy they were aware of).
Create a company / school AI policy is critical before large scale adoption of these tools.
Jamf have provided some good questions for educators to prompt critical thinking ahead of wide scale deployment and use of these tools:
How do tools like Math Notes and the handwriting enhancements impact on the purpose behind the deployment to have that broad impact on learning and teaching?
How do these enhancements, specifically Apple intelligence, lend themselves to a more personalized approach to learning for students?
How might the new AI features be supported where they can have a positive impact or be switched off if they provide too much assistance when the focus should be on the student’s own ability?
Beyond the Rewrite and Proofreading, I think it was the Math Notes that captured the most attention in the area of Apple Intelligence:
Again, the ability to see this as a gamechanger built into the device for a personalised tutor to help solve complex math equations may be something schools, students and parents wish to embrace. Certainly, other platforms have had similar functionality for a while (Math Assistant in OneNote) but the difference here is this is being made available in a native app on all Apple devices meaning there is no further action required for a student access it.
In the end, whilst adding a native calculator to iPad was long overdue, I’m pleased to see that Apple added considerably more functionality to it when they did eventually launch it and the Math Note is an excellent AI powered extension. Building on this, it’s great to see Apple’s “Smart Script” feature use AI to improve the legibility of handwriting, they describe it as:
With the power of Apple Pencil, Smart Script makes handwritten notes fluid, flexible, and easier to read, all while maintaining the look and feel of a user’s personal handwriting. Smart Script allows users to write quickly without sacrificing legibility by smoothing and straightening handwritten text in real time.
My handwriting is not amazing, and my son has dysgraphia meaning his handwriting is often slow, messy and at times difficult for others to read easily. Leveraging Smart Script with an Apple Pencil means notes written with Apple Markup (digital ink) can be automatically enhanced for legibility, spacing and even converted into typed text if required. From an accessibility perspective, this is something many students and educators will be keen to experience so that the best ideas of students are not ‘lost’ behind illegible handwriting.
Lastly, one of the other cool features announced at WWDC24 that will likely resonate with educators and students is some of the custom image generation functionality that is going to be built right into the device – Apple call this “Image Playground”. In a recent AI workshop I ran, I created a bunch of images generated by AI using a third party tool to add some pop and sizzle to my presentation and tweak the images specifically for the themes I was wanting to convey. Now, students and teachers will be able to do this directly from their Apple device which will:
Allow them to use hardware/software they’re already familiar with / own so it will be a quicker task to generate the images
Reduce the need for additional usernames/passwords on third party tools, thereby reducing complexity but also removing risk of student information being compromised if the third party had a security breach
With AI generated images I can see creative writing tasks flourishing as students are prompted and inspired with very bespoke images created for that specific writing task. It will also allow students to illustrate their writing with custom images that will not have any copyright concerns on them.
There were a lot of additional announcements of features in the Apple Intelligence section of WWDC24 which I won’t cover here, however I would make one final caution in this space. It’s evident that all vendors are going to be scouring the cloud and on-device content for ‘context’ to make their AI offerings very smart and useful – this is called ‘grounding’ in an AI context. In many cases this is very helpful and welcomed by the end user. However, It is worth considering when this could go wrong e.g. a teacher using their work iPad for personal usage as well, a student on a shared iPad getting contextual AI info based on the work of another student who used that iPad etc.
This is the world we will all need to navigate as to be effective, AI will need to “know” as much as possible about individuals to deliver the most value.
This seems like a good time to move to Security and Privacy Considerations.
Security & Privacy Considerations
One of the biggest announcements in my mind was the partnership between OpenAI and Apple. For those unaware, OpenAI is the company behind ChatGPT and also the underlying Large Language Models (LLM) that Microsoft rely on with their Copilot AI products. It is the ChatGPT functionality that powers both the Writing Tools and Image Playgrounds mentioned above and both OpenAI and Apple have been quick to talk up the privacy considerations here:
Privacy protections are built in when accessing ChatGPT within Siri and Writing Tools—requests are not stored by OpenAI, and users’ IP addresses are obscured. Users can also choose to connect their ChatGPT account, which means their data preferences will apply under ChatGPT’s policies.
I’ve spoken with many businesses, schools and universities about the privacy features (or not) of various AI products and so it is good to see that Apple have proactively addressed this, stating that user requests will not be stored by OpenAI (and thus used to train the underlying LLM) and a further step being taken to obscure a user’s IP address making it harder (or perhaps impossible) for OpenAI to correlate queries for the same user.
These types of privacy considerations will be increasingly a ‘default consideration’ in education contexts I believe, as well as in other highly regulated industries. Again, a company / organization wide AI policy is critical here to guide users on when and how they can use AI in their work or studies. There has been some high profile criticism of this partnership, notably from Elon Musk (who may have some bias here given his own development of Grok AI on the Twitter/X platform):
If Apple integrates OpenAI at the OS level, then Apple devices will be banned at my companies. That is an unacceptable security violation.
For now, I think it would be prudent for education institutes and businesses to be keeping a close eye on developments in this space.
For me, the fact that Apple devices will prompt the user every time it will go to OpenAI/ChatGPT for help with a user query is a good level of transparency. It indicates to the user that Apple’s own onboard AI requires assistance or additional information to provide a good answer to the user and, at that point, the user can decide if they want their query to go to the internet.
Sam McNeill, Cyclone Technology Strategist and Apple Business Lead
Even with multi-factor in place, a strong unique password is still important. Giving your people the tools to make this easy increases the likelihood of them using strong passwords that are different for each system. It also makes it easier to manage shared passwords such as your business’ social media accounts.
The important point of this control is that your organisation should be providing your staff with a password manager tool that works for them. Without the right tools, your staff won’t be able to make strong passwords.
For organisations prioritising security, this will be a welcome addition and for users with access to an iPhone, iPad or Mac device this will allow them stronger unique passwords for the various apps and services they use. Given Apple’s focus and investment in this area, as the The Verge has pointed out, users may have a higher degree of confidence in using this:
With the backing of Apple, it may seem like a safer option for people spooked by security breaches suffered by others like LastPass.
I have been using DropBox.com’s Password Manager which is excellent and integrates nicely across my Apple devices and Edge browser extension, but will now seriously look at Apple’s Passwords app and see how it compares.
Another announcement from WWDC24 that enhances the privacy and security inside the Apple ecosystem is improvements to Platform SSO on macOS with announcements of IdP integration with FileVault unlock, and stronger security options where developers can sync more services back to the password managed by the Identity Provider. Here’s one example provided:
In this example, the policy states an attempt should be made to authenticate against an IdP before unlocking FileVault. However, a more restrictive policy is applied against the Screensaver unlock where an authentication is required and not just attempted.
Reducing the need for continuous entry of passwords to different platforms is important and more educational and commercial organisations will be looking to embrace Platform SSO as part of their Zero Trust approach (more on this here) – I’m personally really happy to see Apple’s increasing focus on this level of enterprise integration as it will help mainstream the adoption of macOS alongside Windows 11. Further evidence of embracing enterprise device management requirements and support for heavily regulated industries was Apple’s callout for the new external Disk Management Configuration policy, which will now allow configurability of mount policy to be defined as:
Allowed
Disallowed
Read Only
Finally, a comment on the updates to Apple Activation Lock – if you’re unfamiliar a device can be placed into Activation Lock to prevent an unauthorised user from accessing it (usually this is done when a device is lost or stolen). At WWDC24 Apple announced that organisation owned devices in Apple Business Manager or Apple School Manager can now turn off Activation Lock for these org-owned devices. I’d imagine this is a huge relief for schools where a teacher or student has placed a school owned device into Activation Lock based on their personal Apple ID/Account.
I have heard horror stories of schools trying to unlock a device they own when a teacher has left the employment of the school but have locked the device using their personal Apple ID/Account. Thankfully, with this update to ABM/ASM this will be a problem no longer.
Closing Thoughts
There is a lot to process here from WWDC24 and I am sure that over the coming weeks and months more insight and information will be released from Apple themselves and also from the developer community as they start to get hands on with these new features announced from Apple.
As always, education is a large winner here given they get access to industry leading technologies often at a fraction of the price of commercial orgs. However, if you work in a highly regulated industry you will no doubt welcome the continued focus on security and privacy alongside ever-expanding enterprise integration capabilities that Apple have announced at WWDC24.
Many people remain highly excited about the capabilities of Generative AI and Apple’s announcement of their take on GAI, named Apple Intelligence and powered (in part) by a new partnership with OpenAI’s ChatGPT means they are keeping abreast of their competitors in this space and like Microsoft have done with Copilot on Windows 11, it appears that Apple are keen to deeply integrate this into the hardware/OS experience for Apple users.
I was doing my morning skim of the headlines before work this morning when I came across this article from The Post in New Zealand:
This was good timing as earlier this week I had attended an Apple reseller event where the topic and use cases for Managed Apple IDs was discussed at length and so I posted on an internal Teams chat whether this was a good example of where Managed Apple IDs may have prevented the cascading of bad decisions that led to students being exposed to inappropriate content:
So What Actually Happened?
It’s worth reading the article in full, but in case it’s removed or behind a paywall, a quick summary of the facts presented include:
The teacher had been responsible for the purchase, set up, maintenance and upgrade of school devices, and uploading photos from school events.
He had configured at least one of these iPads using his personal Apple ID, presumably so apps could be pushed out to the device(s) from the App Store
(worth noting this is not a compliant way for schools to use Apple App Store apps in a school context)
At some point, the teacher left the school and he later shared his login details when he was contacted by a primary school aged student using the device, who said the teacher’s password was required to remove his account.
A key reminder, that can not be overstated enough, is that you should never ever share your password in any situation as unforeseen outcomes can flow from this
The student must have entered the iCloud password onto the iPad which caused personal photographs and images on the former teacher’s iCloud account, including images of him and another teacher at the school “fully dressed and cuddling or sitting/lying close together” and memes with sexual statements, to sync to the iPad and be discovered by the students.
The students then spoke to the school Principal about the images.
Great to see the students doing the right thing and exercising commendable Digital Citizenship by alerting an adult when they encountered content online that made them feel uncomfortable.
Evidently, there was a litany of bad decisions related to the management of the school iPads made here, each compounding the other – NB this was not a school that our company managed/supported.
Helpful Internal Discussions Amongst The Team
One of the things I like about Microsoft Teams group chats is the speed and input that various team members can contribute to, allowing what I would describe as ‘ad hoc coaching’ – experienced team members reflecting on the incident above and sharing their insights from their experience. This allows rapid knowledge sharing and learning by the entire team and I’m going to share a few of these thoughts below:
Yikes what a situation. That’s a perfect example of why a school should be using an MDM for management of iPads. I bet the only reason that Apple ID was on the iPads would have been app deployment. Also super worrying the teacher just handed over his personal Apple ID credentials rather than removing the device from his iCloud account.
Comment 1
What I like about the above is the immediate recognition of the absence of ‘best practice’ when it comes to managing iPads – the use of an MDM (Jamf, Intune etc), as well as an accurate diagnose of why a school may be using a personal Apple ID – trying their best to deploy apps to iPads, likely unaware of how an MDM could support this task in a more time efficient and infinitely more secure method.
An MDM could have prevented the need for an Apple ID on the device
At the very least, why not a School Specific Apple ID?
Why did the student “need the Apple ID” to access the iPad? Potentially teacher PD required on that one
Good on the student for taking the matter to the principal
Comment 2
Like the first commenter, the second commenter immediately identified best practice that an MDM removes this risk and also suggests a ‘less bad’ option of using personal Apple IDs of possibly creating a school specific Apple ID for the management of these devices – some lateral thinking.
The third point made was a good one – why, precisely, was the student needing access to something requiring the Apple ID on the iPad? Were they trying to buy new apps for the device from the App Store – something that the school would normally like to prevent students from being able to do. The training of educators on best practice of management of iPads in the classroom extends to helping them understand what students should and should not be able to do on these great devices for learning – generally it would not be required for a student to be accessing the Apple ID functionality on a well managed and secured iPad.
Lastly, recognising the student did the right thing by talking to the Principal. It’s imperative that ‘the adults in the room’ reinforce good Digital Citizenship behaviour when they see it. It was through no fault of their own that the students were exposed to this content but the fact they made good decisions and informed an adult should be recognised and applauded.
Considering they are deploying apps with a single Apple ID they probably will not be registered to ASM so managed Apple ID wouldn’t come into affect. I believe most of our customers these days use ASM which we are encouraging heavily.
Comment 3
A third comment recognised the likely absence of Apple School Manager that would have solved for this issue, and the commenter has reinforced our company practice of strongly recommending ASM+MDM for the management of iPads.
Whilst most of the commenters were unconvinced by my initial ‘bait and switch’ comment of whether this news story was a good example where Managed Apple IDs would have ‘saved the day’, there was a general agreement that Managed Apple IDs could and should be used in relation to APNs
On the APNs issue – Cyclone’s standard is to ensure all APNs certificates are created using a Managed Apple ID. Any we find that are using a consumer Apple ID we go through a process with Apple to get the certificate migrated from the consumer ID to a newly created Managed Apple ID
APNs Comment 1
Again, this was a senior Apple engineer reinforcing for everyone on the chat group the company expectations for best practice when it comes to APNs using Managed Apple IDs – great learning.
Final Thoughts
For a random Friday morning, this ended up being a helpful discussion internally where various members of the team contributed expertise, knowledge and opinions related to a variety of topics:
Digital Citizenship
Teacher Professional Development
MDM and Apple School Managed best practice
Respective merits of Personal vs Managed Apple ID
Apple Push Notification configuration best practice
Real world examples/anecdotes to help educate potential customers on why managed services for school devices is a good idea.
Sparking these types of learning opportunities through the framing of a topical and real-world situation where things went wrong in a school (NB: this was not a school we manage/support) is a great way to focus a team discussion on how we can do things better and deliver a superior outcome for both our schools and the students they serve.
Since I’ve moved on from Microsoft, my interests and focus have expanded beyond just the realm of Microsoft365 offerings and I’m dabbling in other technologies that can add value to the education industry and beyond.
In this multi-part blog series, I’m going to explore different flavours of Azure Virtual Machines, so buckle up and enjoy:
Azure Lab Services enable you to easily set up a class, run a training lab, host a hackathon, experiment, and test your proof-of-concept ideas in the cloud.
Configuring a traditional computer lab for specific scenarios has historically been a time consuming process. This has been made easier with the advent of cloud MDM tools like Microsoft Intune which can offer a significant amount of customized experience based on the user signing into the device, however there are still many scenarios that exist where greater levels of customisation are needed (Note: it is possible to use Intune to manage your Azure Lab Services too).
Furthermore, the end users may be bringing their own device (BYOD) that is not compatible or powerful enough for the task at hand – cloud based virtual computer labs provides a very real solution to this situation. In fact, recently I was talking with a school that was in this exact situation – students were using iPad Pros but required a Windows device for a particular online test. The ability to provision virtual machines for short term usage for students for the test was one avenue the school explored.
Other scenarios that Microsoft has created specific ‘how to’ tutorials for Azure Lab Services include:
In a business context, the ability to run training for staff in a contained environment that can be easily re-deployed for different groups of staff is very appealing. Likewise, if you’re conducting UX/UI testing with control groups, having the ability to run repeatable testing in a pre-configured environment is helpful.
Creating An Azure Lab Service
Rather than reinvent the wheel, I’ve embedded a good 3minute video from Microsoft showing the basics for setting up an Azure Lab. Note that the video is 2yrs old and there are some subtle differences to the Azure Portal now, but fundamentally the process is the same.
If you’re more of a ‘step by step’ learner, then the overarching process is as follows:
The Lab Plan is basically a collection of configurations and settings that apply to any labs created inside it. This includes linking it to an active Azure subscription, resource group for management and also the Azure region where the lab VM’s will be deployed.
This is where you configure and create the actual VMs. It differs from the Lab Plan (high level configurations and settings) as it focuses much more on the type of VM you’re wanting in your Lab (OS, RAM, CPU, policies etc)
Note: initially you create a generic username/password to log into the VM. You have a choice to lock the password or allow the end users to reset the password on first login.
Customise the VM: You have a choice of running a standard OS template (choices around Linux, Windows 11, Windows Server etc) or choosing to customise a template with your specific needs.
Essentially, you start the custom template VM, make changes (install required software, make settings changes etc), stop the VM, then publish the custom VM template to the Lab. Details are here.
This process allows you to choose/define the maximum number of VM that will be available to your end users. It’s super easy and the time to access the VMs depends on the number you’re creating.
Note: due to Azure region capacities, I have found the ability to create VMs is limited at times – the Azure Lab Services wizard advises how many VMs you can create in the current region during the Publish Lab process.
It really is that simple of a process and with the Lab created, the dashboard does give you an indicative cost associated with the lab. For experimentation purposes, I created a Lab with 5 VM that had a maximum of 10hrs per VM (so 50hrs total) and the indicative cost was USD$10 if all hours were used:
Shortly, I’ll share some tips on how to manage billing by implementing some guardrails around usage and avoiding cost blowouts.
Connect To A Lab
Once a lab is created and published, the ability to connect to each of the individual VM can be managed in a few ways, either by assigning VM to a specific student (AzureAD group sync or CSV upload), sharing a self-registration link, or emailing an invite to users. Once received, they can start the VM and connect to it using the RDP client of their choice. Either the Lab owner or the student can start the VM and then the remote desktop connection file can be downloaded and used to launch the remote desktop client to connect:
The student would need to sign in at the Azure Labs Portal with their organisational AzureAD credentials and they need to know the initial VM username/password created above (and, if configured, may be prompted to reset the password on first sign in).
Alternatively, if comfortable, a host and port number can be shared with an end user directly from the Lab VM pool page e.g.
Here is the same VM connected to using the Microsoft RDP client on my MacBook:
The Azure Lab Services dashboard allows you to see at a glance which machines are on, and how many hours of their assigned quota have been used:
With the appropriate permissions, a Lab Creator can start, stop or reset any of the VM in the lab. An individual student can turn on/off any VM in a lab that has been assigned to them through the portal.
One of the biggest considerations and concerns from organisations new to Azure Virtual Machines is the issue of cost and more specifically, how to avoid unpleasant bills for un-budgeted consumption! There is detailed guidance that you can read here
The good news is that Azure Lab Services offers three main ways to manage costs.
Quota Hours
The simplest way to have as close to a ‘fixed’ maximum cost as possible is the requirement to define the number of hours quota to the VM at the time of the lab creation. In my example above, I created 5 VM for a maximum of 10hrs per VM, that would have a total approximate budget of USD$10.
There are two variables that affect this cost: if students use less than the maximum quota of hours and the VM is turned off then the cost will be lower. More importantly, if the Lab Creator (professor, assistant, trainer etc) go into the VM to assess student work, then there is a charge for the consumed resources during these activities above and beyond any student consumption (and also above the quota hours)
Quotas are a good way to allow students to work on the VM for homework outside of scheduled class hours.
Note: scheduled hours and quota hours can operate separately or together. From the Microsoft Docs:
The use of schedules for a lab is optional and you might specify user quota instead, or use a combination of both. User quota is the time that lab users can run their lab VM outside of scheduled time. For example, to complete assignments or homework. Any scheduled time doesn’t count against extra time that lab users have. A lab can use quota time, scheduled time, or a combination of both.
You can set a schedule to implement a hard stop on usage of VMs (e.g. end of the school/business day) that helps with ensuring no VM is left on accidentally creating wasted expense.
Settings
Put simply, these are ways to automatically shut down the VM if there is no active usage or no user connects to the VM once it starts. The options are as follows:
Whilst turning off a VM based on idle time makes a lot of sense to avoid unnecessary costs, getting this setting right may depend on your scenarios – some forethought into an appropriate ‘timeout’ period would be beneficial to avoid frustration of a user getting logged out and having to restart their VM.
A key takeaway for me is that there are various mechanisms that can be put in place to provide assurance around costs and prevent unexpected bills for the use of Azure Lab Services
Final Thoughts
Azure Lab Services offers affordable, flexible virtual machines in a lab context for a variety of services. It’s quick and easy to deploy and, if desired, the VM can even be managed by your Intune MDM licensing.
Given many educational institutions use iPads or ChromeBooks, Azure Lab Services can provide an ‘on demand’ virtual Windows lab that can be easily connected to from any OS. This can go some way towards delivering a more equitable device experience by removing the limitations of the host device a student may use by supplementing it with a virtual desktop that has comparable specifications for all students in a class.
I certainly look forward to having more conversations with customers about scenarios were Azure Lab Services would be of benefit to them.
There are two things that I’m a sucker for when it comes to technology: a great data visualisation (often achieved via PowerBI) and a seamless cloud deployment and management of device (usually by Intune).
This morning I read a tweet from Jannik Reinhard that managed to combine the two of them in a single blog post, so naturally I wanted to read more! As always, I try to credit the original source when I’m inspired to write my own blog based on their content, so check out his tweet here:
The genius behind this blog post is the beta feature called the Microsoft Intune Data Warehouse – if you’re wondering what this is, then the documentation states:
The Intune Data Warehouse samples data daily to provide a historical view of your continually changing environment of mobile devices. The view is composed of related entities in time.
The warehouse exposes data in the following high-level areas:
App protection enabled apps and usage
Enrolled devices, properties, and inventory
Apps and software inventory
Device configuration and compliance policies
These are all super helpful things to know and, whilst Intune provides it’s own reports, sometimes you want to drill a little deeper into the data or present it in a way that makes more sense for your own preferences for troubleshooting.
Getting Set Up For Custom Reporting With PowerBI
Jannik’s blog does a great job stepping you through the steps to get set up – honestly, this is only going to take you 2-3minutes. I could screenshot it, but he’s already done this here
The key is to select ‘Get Data’ in PowerBI App and then search for “Intune” in the search box and you should see the connector:
The other super helpful contribution from Jannik is the Intune Dashboard template he’s build and shared on GitHub – you can download it from here. It comes pre-populated with his data, but a simple click of “Refresh” in PowerBI and you’ll be seeing your own data reporting from your tenant.
Sample Data From My Intune Console
Within 5 minutes of reading the original blog I had my own data being visualised and here are the three main views:
Apps
Devices
Config Profiles
One thing that confused me at first was the three buttons at the bottom of the report for App / Device / ConfigProfiles – you can see these highlighted above. I initially thought you could click on these to select each report, but you actually still need to click the tab at the bottom of PowerBI for each report – see below:
Correcting the above – Jannik helpfully reached out on Twitter and reminded me that when using PowerBI Desktop you need to select ctrl+click to trigger buttons in a report. Once you publish the dashboard to www.powerbi.com then you no longer need to hold ctrl+click, but simply click on the button and it will change views. Thanks for the reminder Jannik!
Other than that, the reports work beautifully and the data can be refreshed daily to see the latest snapshot. With a little tweaking of the PowerBI report you can call out out whatever data is most important to you – have fun!
UPDATE 5th August 2022: My colleague Scott Breen has written some really great documentation outlining the options to upgrade from Windows Home to Education edition on the official Microsoft Docs – do check it out on the link here.
I’ve posted a fair bit about Intune on this blog previously, and I try to use this as a place to answer my own questions but also those of customers and partners that I engage with in my day job. One of those questions that recur from time to time is:
How do I upgrade from Windows 10 Home to Windows 10 Pro or Education using Intune if I can’t join a Windows Home device to Intune?
Common question to me!
I first tackled this topic back in 2017 in this post, but like the Intune product itself, my knowledge has evolved a fair bit since then! To that end, I decided to make the following video showing how you can easily upgrade Windows Home Edition devices to higher versions provided you have an eligible Volume Licensing key and suitable licensing in M365.
Check it out:
What do you need?
Windows Home device
I used a Hyper-V virtual machine running the standard Windows 10 ISO and selected Windows Home Edition when installing it in the VM (I selected “I don’t have a product key” so it was unactivated)
Microsoft Endpoint Manager / Intune and Azure Active Directory Premium licensing
There’s a lot of ways you can license this, I had a demo tenant with M365 A5 licensing in it so was sorted. I created a demo user called Niamh and allocated an M365 A5 student license to the user.
For those that don’t like to watch videos and prefer something to follow along, I’ll outline the process below. For the sake of brevity I’m not going to recreate every step (you need to do some work yourself!) but the main thrust of the process is here.
Ensure you’ve got a Windows 10 Home Edition VM working correctly:
This is easy to do by going to Windows Settings and About and looking under the Windows Specifications:
AzureAD Register the device to start getting policies/settings applicable for Windows Home Edition:
Go to Access Work or School and click on Connect:
Enter your relevant user details – note that in my example I’ve customised the login screen with a backdrop image of the school and the school logo above the username to provide some visual cues and assurance that the user is indeed validating against their own school correctly:
It might take a minute or two to complete the registration but be patient:
Once you’ve done you should see your account listed now:
At this point you can either wait patiently for the policy to apply or you can speed it up by clicking on the account, choosing “info” and then manually forcing a sync:
Time to leave that for a minute or two and head over to Intune to complete the process
Configure Microsoft Endpoint Manager (MEM) / Intune with an Edition Upgrade Policy
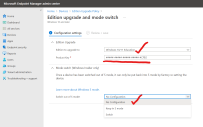
I’m only going to give you the basics here and assume you’ve got a working knowledge of creating and assigning configuration profiles in Intune, but you’re going to need to create a new Windows Configuration Policy and use the Template for “Edition Upgrade and Mode Switch”
You’ll need to walk through the wizard to complete and assign it to the relevant user/groups you want to upgrade but when completed should look something like this:
Note that I’ve selected Education Edition because this matches my VL Upgrade Key that I obtained above, and I’ve opted not to configure the S Mode Switch as I’m running standard Windows 10 Home Edition in my VM. I’ve also taken the lazy approach and assigned this to All Devices group (you should be more granular in your targeting of this type of policy ideally!)
Check to see if your Win10 Home Device has received any apps / policy
This is where the fun begins – if you go back to your Windows VM you should be able to hit the start menu and see if any of your apps have been deployed to the device (assuming you’ve configured apps to be deployed to this group of devices). Here are mine – all of which arrived on the device in the first 5minutes after registering it:
You might be asking: how are you deploying applications to a Windows 10 Home device? The answer is that Intune allows an AzureAD Registered device to receive apps from the Microsoft Store for Education and also some policy that is applicable to Windows Home. So now I know I’ve got apps on the device from Intune, what is the dashboard showing me?
A couple of things to note here:
When the device first registers the “Device Name” is rarely shown correctly – it requires a full sync to update correctly.
The same is true for the “OS Version” field – usually it starts out as 0.0.0.0 until the Windows device reports home
Note the “Ownership” – because this is effectively a BYOD that has been AzureAD Registered only (and not Joined) it’s automatically categorised as Personal vs Corporate. You can do some funky stuff with dynamically populated AzureAD groups based off Corporate vs Personal ownership devices.
Lastly, you can see the Primary User UPN on the far right confirming the M365 A5 user (vs the local administrative user on the Windows 10 Home which was simply “John”
If you click on the device name here and go to Device Configuration you can see which policies have applied:
It’s worth nothing some have succeeded and some have failed. Given this is a Windows Home Edition device not all policies apply. Even the Edition Upgrade Policy has failed and if you click on it you can see this:
Do not be deterred – the upgrade has worked, but the error here I believe is a combination of using a non-activated Win10 Home testing licensing and also the KMS Client VL Key for this demo. The trick now is to reboot the device and watch the upgrade take place!
Reboot your Windows 10 Home VM & Watch The Magic Happen:
You will note that during the reboot, there is a display showing Adding Features:
This is the upgrade from Windows 10 Home Edition to Windows 10 Education Edition taking place. Once this is completed you’ll still sign in with the local user on the device – in my instance the Intune compliance policy applied and required a password reset to a more complex password:
‘
And now all that is required to do is check the upgrade has worked successfully:
Edition Windows 10 Education Version 21H2 Installed on 10/12/2021 OS build 19044.1288 Experience Windows Feature Experience Pack 120.2212.3920.0
Success!
A Word Of Caution:
I was interested to see what would happen if I initiated an Intune “Fresh Start” or “Wipe” of this device – would it revert back to the Windows 10 Home Edition that I started with. Afterall, one scenario that this whole process might apply to is student BYOD devices being upgraded to Windows 10 Education whilst they are students at a school and then reverting back to Home when they leave. (There is actually a way they can upgrade to Windows 10 Education for the life of their device using the Kivuto Store and Student Use Benefit – check this blog here)
What I leant from my testing is that both a Fresh Start and a Wipe did not remove the VL Key. In fact, I saw this message flash up during the reset of the device:
I decided to test further with a physical laptop I had that came with an OEM embedded license of Windows 10 Pro Education which I had automatically upgraded to Windows 10 Education as a result of completing an AzureAD Join and the Windows Subscription Activation process kicking in.
So, I initiated a remote wipe of this device from Intune and it duly reset and reverted back to the OEM Windows 10 Pro Education based off the embedded key the device shipped with.
Learnings: It would appear that from my testing when you use a Windows 10 VM that does not have an embedded key, a reset of the device retains the VL activation key implemented via the Intune Edition Upgrade Policy. However, when you use this upgrade from Home to Pro or Education on a physical machine that has an embedded key, a remote wipe will revert back to the original key. Phew!
What If You Want The User To Sign In With Their AzureAD UPN Instead Of Their Local Account?
A friend asked me about this – now you’ve upgraded from Windows Home to Windows Education how can you get the user to now sign in with their AzureAD credentials instead of the local user they had created when the device was running Windows 10 Home Edition?
Well, follow along to see how this can be done – first the user signs in with their local admin account
Remember the device is currently registered to AzureAD so you will need to go to Accounts and “Access work or school” and then disconnect:
This might take a couple of minutes, but then you’re going to add the account back this time, but take care to select “Join this device to Azure Active Directory”
Authenticate as you normally would with your AzureAD user:
You will be prompted about joining this device:
It takes only a minute or two and then you’re prompted the device is connected to the organisation (in my demo example this is called “Contoso” and then you’re guided to signing out and switching account to log in with your AzureAD Credentials:
It’s worth noting the icon has changed showing the AzureAD connected status:
If you now sign out of the device as your local admin user (John in my instance) you’ll see the option to sign in as “Other user” in the bottom left:
A couple of things to note here:
The AzureAD domain name is already pre-populated with”sign in to: m365.education” – this is actually an Intune policy to make it easier and faster to sign in.
Hence, I only need to enter “niamh” in the username field and not the full UPN of niamh@m365.education
Because the device is AzureAD Joined it immediately resolves the full name of the user and displays on screen (subsequent signins would also load the profile pic from AzureAD:
You can now see that the account is connected to Contoso’s AzureAD – this is different from theb “work or school account” that Niamh’s account was previously signed in as when the device was Windows10 Home Edition and also after the immediate upgrade to Windows 10 Education. Note also that the Intune policy has already pushed out the Chrome Browser (via an MSI) to the desktop with other applications and settings being applied to this user too:
Final Thoughts
To recap:
This device started as Windows 10 Home Edition with a local admin user
We completed a “Work or School account” AzureAD register of the device
This enabled us to push out a policy from Intune for a Windows Edition Upgrade to take the device from Windows 10 Home to Education Edition
We then signed back into the device with the local user account (John) and disconnected the school or work account from AzureAD, and instead completed an AzureAD Join with the same user.
We then logged out of the device and signed back in with the AzureAD account of Niamh McNeill (and not the local user John)
As I said at the start – one of the primary reasons I write this blog is to cement my own learnings, upskill so I can advise customers and partners more effectively and accurately and then share this learned knowledge with the wider community. This question of how to go from Windows 10 Home Edition to higher version of Windows e.g. Pro or Education via Intune is one that has come back time and time again – in fact, for me ever since Scott Duffey wrote a blog post entitled 10 Ways to Enroll Windows 10 Into Intune
Where would this scenario be useful? Well, obviously if you wanted to allow students/staff to bring a BYOD to your school or workplace and then upgrade the Windows Edition to provide additional functionality, security and compliance would be a prime example in my mind.
I trust this has been helpful – if I’ve missed something or you’ve got other questions or scenarios throw it in the blog comments below.