Categories
Microsoft365 Windows 11

Adventures With Microsoft AutoPilot On Education Shared Devices (Part 2)

Last week I posted Part 1 of this blog series, exploring how schools can automate the configuration and deployment of their shared devices using Microsoft AutoPilot and Intune. Again, if AutoPilot is new to you, then I encourage you to watch this very short video explaining how it works:

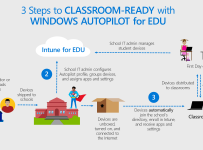
Since writing Part 1, I also found this great blog post specifically on this topic from January 2019 which included this helpful graphic:
Autopilot for Edu

Overview:

As this blog post will be a little longer (and more technical) I’m going to give you a break down of what is to come so you can skip to the important sections relevant to you:

  • Part One (read this blog post here):
    • Identity – why use a cloud identity?
    • Why use AutoPilot?
    • Configuring Autopilot
    • Enrolling your device
  • Part Two:
    • Intune vs Intune for Education
    • What are CSP?
    • Building a custom CSP Policy
    • Using LOB App Deployment in Intune

Now it’s worth stating at this stage that I am not an IT administrator by profession. Whilst I’m probably more technical than many, I’ve got the following working through a combination of relying on the detailed guides in the Microsoft Docs and awesome technical colleagues who have shared some of their expertise with me. Additionally, like you, I read a bunch of blogs to see how people have done this in the past. This blog is a small contribution to the community who like to learn from other’s experiences. If you’re reading this and are more technical than me and see some improvements or corrections in what I’ve done – I’d love to hear from you in the comments section below.

With that said, let’s get started!

Intune vs Intune for Education

Intune as a standalone Mobile Device Management (MDM) tool has been around for a long time, however Intune for Education was only launched in 2017.

A key point to clarify is that both versions use the same backend system to manage the configurations – Intune for Education is really just a simplified interface for educators to leverage. If you make a change in Intune for Education, it’s reflected in the equivalent settings inside of Intune (and vice versa).

I’ve written a more detailed blog about when to decide which version to use that you can read here however I commonly ask the following questions in helping schools decide which version to use:

  1. Are you only going to be managing Windows10 Devices?
    1. Yes? Use Intune for Education
    2. No? Use full Intune for multi-OS management
  2. Will teachers and other less technical people be wanting to manage settings and push applications?
    1. Yes? Use Intune for Education if possible (see above re: Win10) as the interface is simplified and very easy for non-technical people to use.
    2. No? Use either, if you’re more comfortable with a large amount of settings and configuration options then the full version of Intune will be more valuable.
  3. Do you have advanced configuration settings and policies you want to configure on the devices you’re managing (i.e. replicating Group Policy).
    1. Yes? Use the full version of Intune standalone as this has significantly more settings and options
    2. No? Use Intune for Education if dealing only with Windows 10.

Remember, the important thing to get this working is to use AzureAD as your underlying identity management. You can get a lot of assistance from the Microsoft Education Documentation and Resources link.

EMS-edu-inforgraphic-1024x699

It is worth pointing out that since Intune for Education was first released, new features have been added to it, including the ability to manage iPads in late 2018 – really helpful for schools that are wanting to develop a “single pane of glass” for configuring and deploying all their educational devices.

What Are CSP?

CSP stands for Configuration Service Providers and the best place to get started if you have no knowledge of this is here – CSP For Beginners.

A CSP is an interface in the client operating system between configuration settings specified in a provisioning document and configuration settings on the device. Their function is similar to that of Group Policy client-side extensions in that they provide an interface to read, set, modify, or delete configuration settings for a given feature. Typically, these settings map to registry keys, files or permissions. Some of these settings are configurable and some are read-only.

The reference to Group Policy client-side extensions above is important and useful because most IT Admins are familiar with these, and when you explain that CSP achieve the same outcome but are managed out of the cloud from an MDM like Intune, they generally get the concept quite quickly.

In essence, a CSP allows you to restrict/allow various functionality on an end device – in this case we will primarily be talking about Windows 10 – such as allowing the Edge web browser to make search recommendations. Some of these settings are enabled via the GUI inside of Intune, others need to be manually created with a Custom CSP Policy (read on below for an example). To return to the Edge search setting example, in Intune the policy to allow search suggestions in the Microsoft Edge address bar uses Browser/AllowSearchSuggestionsinAddressBar in the Policy CSP

edge browser policytocsp
The GUI inside of Intune on the left simply configures the CSP on the right to either 0 (not allowed) or 1 (allowed)

Once you understand the concept of what you can do with CSP and are ready to get your training wheels off, reading the full list of Policy CSP available here is a great starting point. In fact, because not all CSP are currently available in Intune’s GUI, you may find some advanced features that can only be deployed using the Custom CSP Policy (again, read on for a good example of this).

It’s worth noting that the full version of Intune has many capabilities to manage iOS devices, often requiring a custom Profile to be created and pushed to the iPad. I’ve written a five part blog series showing how you can do this on iPads that is worth reading here.

Building A Custom CSP Policy

I got tipped off by a friend who is far more technical than me to two CSP that exist in the Authentication section and are designed to speed up the initial login of Windows 10 devices in a shared environment like a school:

These are:

  • Enable Fast First Sign In
    • This policy is intended for use on Shared PCs to enable a quick first sign-in experience for a user. It works by automatically connecting new non-admin Azure Active Directory (Azure AD) accounts to the pre-configured candidate local accounts.
    • OMA-URI = Authentication/EnableFastFirstSignIn
  • Preferred AzureAD Tenant Domain Name
    • Specifies the preferred domain among available domains in the Azure AD tenant.

      Example: If your organization is using the “@contoso.com” tenant domain name, the policy value should be “contoso.com”. For the user “abby@constoso.com”, she would then be able to sign in using “abby” in the username field instead of “abby@contoso.com”.

    • OMA-URI = Authentication/PreferredAadTenantDomainName

Both of these require Windows10 Pro or above to work.

Both Intune and Intune for Education are rapidly adding new features into the GUI and, as indicated in Brad Anderson’s blog post above, Intune for Education recently added the Preferred AzureAD Tenant Domain Name feature to the GUI:

Preferred AAD Tenant Domain.PNG
Available in the Settings Blade, an IT admin can rapidly add this setting to Win10 devices now.

However, if you’re wanting to build a Custom CSP Policy for a setting that is not in the GUI yet, such as enabling Fast First Sign In, then the steps would be as follows:

1.PNG

2

3
Note in the main display you can see existing Profiles I’ve created already, including my example “Fast Signin and UPN Default”
  • The “Name” and “Description” Fields are entirely up to you, however make sure you choose “Windows 10 and later” for the Platform and, critically, you choose “Custom” for the “Profile Type”. On the left below is my configured policy, on the right is the options when creating a new one
  • Once you have a Profile created, you need to add settings to it so click “Add” – this is where you need the documentation to guide you for the correct CSP e.g. for Authentication CSP

5.PNG

  • Again, the “Name” and “Description” fields are largely up to you, but the critical fields are the “OMA-URI” and “Data Type” and “Value” fields are all going to be informed from the CSP documentation

6

Here are my completed examples:


7a
In this example the Data Type is a string, as I’m putting in my O365 tenant’s domain name. The full OMA-URI in this example is: ./Vendor/MSFT/Policy/Config/Authentication/PreferredAadTenantDomainName
7
In this example the Data Type is an Integer with “1” = on and “0” = off. The full OMA-URI in this example is: ./Vendor/MSFT/Policy/Config/Authentication/EnableFastFirstSignIn
  • With your custom CSP Policy created, you now need to assign this to devices under the “Assignments” Setting – in my example I’m applying it to All Devices:

8.PNG

At this point, you’re pretty much done and you can sync devices to ensure the policy is pushed to them. Reporting inside of Intune will advise you whether this has been successfully deployed to devices:

9

In my experience, applying the two policy settings for shared devices in education significantly improves the initial sign in experience in two ways:

  1. Fast First Sign In – does exactly what it’s name suggests, reducing the time considerably for a student to sign into a Windows 10 device for the first time
  2. Preferred AzureAD Tenant Domain Name – given many younger students are not great at typing, or remembering relatively complicated text like a school domain name, allowing them to simply type their username e.g. “sam.mcneill” or even “samm” (based on school username policy) reduces the complexity of the sign in process.
    1. If you’re after a creative way to help younger students remember ‘complex passwords’ then have a look at my blog post on this.

As you can see, you have very high levels of control over devices when you’re using CSP, either through the GUI in Intune itself, or via building custom CSP policies as I did above. If you want even more control, you can even explore using ADMX Templates inside of Intune.

Using LOB App Deployment in Intune

The last feature I’m going to show in here is a trick I learnt from David Kozera to speed up the access to shared applications for users when they first sign in.

Intune for Education initially allowed only apps inside of the Microsoft Store for Education to be deployed to devices, which was great if you were running Windows 10S, but less helpful if you had a need to install apps that were not inside the store. They did eventually add the ability to install .msi packages, and inside of the full version of Intune you can actually install quite a range of different application types, including the recent addition of Win32 apps.

Why is this important? Well, many schools I speak to want to use Intune to push out Minecraft: Education Edition to their student devices, and simply select the app in the MS Store for Education and deploy it using either version of Intune. This works flawlessly, but one of the downsides on a shared computer is that apps deployed from the Store deploy to the user rather than to the device. What this means in practice is when a user signs in for the first time to a shared device they do need to wait a few minutes for apps from the Store to appear on their device.

Using Intune to push Minecraft:EE as an LOB app, rather than a Store app, makes it instantly available to a student when they log into a shared device for the very first time. This means no waiting for apps to appear and no lost teaching time.

This is referenced in this document here.

Let’s get started:

LOB 1.PNG

  • Scroll down a little further and download the “Required Frameworks” file as well, as you’re going to need this in Intune shortly:

LOB 2.PNG

  • With the two files downloaded, you need to return to Intune and click on “Client Apps” and then “Apps”

LOB 3.PNG

  • You need to click “Add” to start building a new app – see below in my screenshot you can observe the different types of apps that I have available to deploy, and I’ve circled the Minecraft:EE Universal App (.appx) as a Line of Business app, as well as Chrome Browser as a .msi Line of Business App, compared to the standard Microsoft Store apps.

LOB 4.PNG

  • Make sure you choose a Line of Business App:

LOB 5.PNG

  • Upload the .aopx version of Minecraft and the dependency framework file you downloaded:

LOB 6.PNG

  • Configure the app information as it will appear to your users once installed on their device:

LOB 7

  • With this done, you can now assign the app for deployment based on your groups of devices – it will automatically install the first time and be instantly available for any user as soon as they sign into the device the first time.

Final Thoughts

Cloud Identity and Cloud MDM’s make the management of devices easier than ever. For schools, who often have limited funds and resources to manage devices, exploring AutoPilot and Intune for Education makes a lot of sense to simplify the management and deployment of devices, as well as reducing the need for on-premise servers for device provisioning.

As these services become even smarter, remote resets of devices and troubleshooting become easier as well. For many, however, their view of managing Windows is from many years ago and they simply do not have experience with Windows 10 and modern practices around deployment.

IF you’re interested in knowing more, reach out to me on Twitter or if you have your own tips for improving deployment in this way, drop a message in the comments below.

Categories
Microsoft365

Flipped Learning Hacks With Microsoft Teams & Meet Now

Update: 25th Feb 2019: thanks to all those who have shared and commented on this blog on Twitter – really appreciate it. I saw the following Tweet from Craig Render sharing how mobile phones can be added to the equation:

https://twitter.com/jetpack/status/1099776882877190149

This got me thinking about how smartphones could be used to expand the Flipped Learning component of these lessons and it reminded me that Microsoft Stream has a smartphone app that allows you to download the content for offline play – in other words, creating a Podcast type listening/viewing experience of the flipped lesson.

I have an iPhone and you can get the Stream app from the iOS store here. I’ve used the offline feature for listening/watching content on flights before and it’s a great time saver. For students that perhaps have to commute on lengthy bus or train rides, this could be an awesome way to turn that into productive learning time by providing a Flipped Learning experience through Microsoft Teams and Microsoft Stream.

Flipped 4
Using Microsoft Whiteboard to outline Flipped Learning Ideas

Recently, I’ve had a number of conversations with educators and school leaders who have expressed renewed interest in Flipped Learning. Whilst many have experimented with this in the past, for a variety of reasons they’ve pulled back on it from being a regular component of their teaching. Now, however, it seems more are willing to give this a go as increasing numbers of schools introduce BYOD programmes and also platforms like Microsoft Teams for creating a digital hub for learner activity.

What is Flipped Learning?

There are plenty of definitions for this and if you’re interested in joining the discussion then I suggest you check out the #FlippedLearning hashtag on Twitter. New Zealand’s TKI website (Government sponsored teacher resource site) has a good definition of Flipped Learning here:

In a flipped learning setting, teachers make lessons available to students to be accessed whenever and wherever it is convenient for the student, at home, in class, on the bus, or even from a hospital bed. Teachers can deliver this instruction by recording and narrating screencasts of work they do on their computers, creating videos of themselves teaching, or curating video lessons from trusted Internet sites.

If you’re interested in going deeper, do check out the The Flipped Learning Model – A White Paper available as a PDF download.

Flipped 5.PNG
Differences between a traditional and a flipped classroom model. Credit

Why Use Microsoft Teams “Meet Now” Feature For Flipped Learning?

For schools that are using Microsoft Teams already as their digital hub or classroom for online learning, extending this for use in Flipped Learning is an obvious choice.

I’ve written about Meet Now previously on this blog, but essentially it’s a video calling feature inside of Teams that allows you to start a call and then optionally invite attendees to it. For Flipped Learning purposes, Meet Now would not typically see you include a guest on the call (unless you wanted another teacher or expert to join and help explain concepts), but critically there are two features inside of Meet Now that you can leverage for Flipped Learning:

  1. Screen Sharing Feature
  2. Recording Feature

Example of a Screencast recorded in Microsoft Teams

The video above was recorded using my cellphone as an internet connection so the quality is not as high as would normally be produced on a wireless network in a school/home, but you get the idea of how I used Teams to share and record my screen. Scenarios where I would typically consider some flipped learning lessons would include:

  • Relief Lessons: if I knew I was going to be away from school for a period of time (e.g. on a sports tournament or taking a camp) then recording some content for my classes is a quick and easy way to ensure they will continue to progress their learning in my absence
  • Introducing Major Assessment Tasks: one of the keys to ensure students succeed in assessment is helping them understand what is required of them from the task and how they can adapt it for personalised learning (where applicable). This is often a lengthy and time consuming process and may need to be repeated for students who were absent. Recording this once in Teams is a great way to ensure a high quality explanation that all students can access at any time (and go back and re-watch if they’re getting stuck).
  • Scholarship Classes: This came up in a discussion with some students recently where they were discussing how they can get access to scholarship level classes when there were clashes with their timetables. I see this working in two ways:
    • The teacher leading Scholarship may in fact record a series of key ideas / learning concepts using Meet Now / Recording in Teams and start to build out a bank of “lessons” or “key concepts” that students can tap into and watch at any time. Over a number of years, this would start to create a truly valuable resource.
    • Often Scholarship Classes are run before/after the school’s timetabled lessons, meaning there are clashes and students can not always be present. If the teacher recorded the lessons using Teams (and possibly a wireless mic/headset) then all content would be available for students even if they were absent.
  • Extension Activities / Difficult Concepts: Teams would also be a great platform for recording more complex and difficult concepts that take time to explain clearly or in different ways. This would allow the teacher to introduce students to them in a Flipped Way, allowing for ‘watch on demand’ as needed.

Microsoft Teams is the perfect platform for Flipped Learning Recording because:

  • If the school is already using Office365 then Students are ideally already in Teams (consider using School Data Sync to automatically populate students into classes)
  • Teams has the built in Recording Features and Screensharing to enable quick and easy Screencasting on any platform (Windows 10, MacOS, iOS)
  • Recordings are automatically published to Microsoft Stream for secure viewing either inside of the Team itself, or on the Stream platform inside of Office 365.
    • It’s worth noting that Stream automatically transcribes your speech inside of your video, allowing everything you say to be searched. This can be especially helpful if you’re a teacher that has certain key words such as “In the end of year exam…..” which students could search across your videos for!
Flipped 3
An example of me searching the automatically generated transcript inside of Stream for “flipped” in my video. You’ll note the time stamp to the left and my spoken text to the right. If any of these are clicked the video is automatically cued up a few seconds before the searched for word or phrase.

Tips For A Successful Flipped Learning Recording In Microsoft Teams:

To make the most of Microsoft Teams to record a Flipped Learning lesson I would encourage you to consider:

  • Using a wireless headset or mic as your audio input, rather than the built in mic on your computer. This will make your voice clearer, as well as reducing ambient noise (and clicking from your keyboard, often positioned very near a built in mic!)
  • Have a touch / digital ink enabled device like my Microsoft Surface – this really unlocks the power of a Flipped Lesson, by allowing you to ink / annotate as if you were writing on a whiteboard in your classroom.
Flipped 8.PNG
inking in Word is a powerful way to use Flipped Learning, calling out the important sections of an upcoming assessment for example. Note that you can even use “Ink Reply” so students with access to the document and see your inking replayed, step by step.
  • When ready to record in Teams, follow this sequence:
    • Launch the Meet Now meeting inside of the correct Channel inside your Teams App
    • Blur your background if you want additional privacy
    • Share your screen – remember, you can share your entire desktop (recommended if you’re going to be switching between multiple apps), or a single application such as a web browser, or Word, OneNote etc.
    • Start Recording when ready (if you have others on the call, do make sure you advise them the session is being recorded)
    • When you’re finished, either simply hang up the call to end it, or stop the recording in the same way you started it.
  • Post-Recording the Flipped Learning lesson will automatically be uploaded to Stream and embedded into the Channel inside of Teams that you recorded it in:
    • Expert Tip: Inside of Teams you can create a dedicated tab along the top just for Stream and the Videos you’re recording – learn how here.
Flipped 2
Students can comment/ask questions about the video/lesson directly inside of Teams

Final Thoughts:

I am a big believer that balance is important in the classroom. This relates to balance between the use of technology and non-technical tools when teaching concepts. Similarly, a classroom that is 100% “flipped” will start to lose effectiveness over time, simply because it is always the same. Teachers need to find the balance between recording resources that can be used to support a flipped model, with doing “live” teaching in the classroom and promoting interaction and discussion amongst the students.

There are many tools available to empower teachers to record their screens for flipped learning, even PowerPoint supports this now, however think the power available in Microsoft Teams, combined with the automatic upload into Teams with transcription and search, makes it the best possible tool for quickly creating flipped content. The audio quality recorded in Teams is excellent – in fact I use it when recording our educational podcast with my colleague based in Singapore.

I encourage you to give Flipped Learning with Teams a go and post any comments or tips from your experience in the comments section below.

Categories
Microsoft365 Windows 11

Inaugural MIE Experts Hui 2018

IMG_7547
Hosted at the Microsoft Auckland offices, the Mission statement, translated into Te Reo Māori, was present across all activities

I’ve had the privilege of spending the weekend in Auckland with some amazing educators from across New Zealand, with guests flying in from Australia and the USA as well.

IMG_7531
Anne Taylor, Teacher Engagement Manager for Microsoft NZ, kicked off the Hui on Saturday morning

MIE Experts are part of the Microsoft Innovative Educator program who have consistently demonstrated skills in the Microsoft Education tool sets and share their knowledge, skills and experiences with other educators. This two day event was organised by MIE Fellows – a handful of teachers who have demonstrated exceptional skill and commitment over an extended period of time. The Fellows, made up of Nikkie Laing, Morgan McKeen, Rachel Chisnall and Steve Martin helped to  create the event and promoted it on the following website:

https://mieexpertsnz.org/

Following the successful formula of similar events, the Hui kicked off with keynotes both mornings, before breakout sessions led by the MIE-E’s that delegates could choose to attend. On the Saturday afternoon the Immersion Sessions were thrown open to any educator that wished to attend, not just MIE-E teachers. I was invited to present on OneNote and did so with the blurb here.

With an audience of tech-savvy teachers a Twitter hashtag was mandatory and you can see some of these tweets on the following hashtag: #NZMIEEHUI18. A small sample of these tweets are embedded further down this blog post.

Sunday afternoon saw the educators working on a project  in small groups spread around the Microsoft office that required applied computational thinking skills to come up with a solution:

Over the course of the weekend I spoke with many of the educators present and they shared their enthusiasm on being able to come together and be inspired, challenged and encouraged by each other and develop a real sense of community.

They are an incredibly talented group of individuals, passionate about educating the future generations and it was a privilege to be a part of the weekend.

Auckland turned on some pretty wet and wild weather across the weekend, but fittingly, a rainbow emerged over the Auckland Sky Tower just as the event was concluding:

Skytower.jpg_large


Categories
Microsoft365

When Life Gives You Lemons… Eat Dog Food

LemonsI have been in Singapore this past week at the APAC Education Partners Conference which was a great event and an awesome time to connect with many new partners and also re-connect with the colleagues in my team based in Singapore that I have not seen for a few months.

I ran a bunch of sessions including a Minecraft:Education Edition three hour training event to 30 partners. Being Asia, a group photo after the event was mandatory:

IMG_7258

I also enjoyed the usual sights and sounds of Singapore:

One of the true highlights was visiting the Tanglin Trust School for a couple of hours on Friday morning where we were hosted by Steve Morgan who shared the school’s journey from students almost exclusively using MacBooks to now using ‘touch and pen’ enabled devices and Microsoft OneNote. This was quite the transformation and involved significant planning, trialing and communication but as I wandered the halls looking into the classrooms it was evident that virtually all of the teachers had embraced OneNote in a serious way – it was everywhere!

https://twitter.com/stevesingapore/status/971995253031895042

I liked the following educational take on ‘The Ten Commandments’ that was on the wall in the school:

IMG_7261

The Problem – Being Given Lemons

On the day before I was to fly out I was asked to help configure 60 Surface Pro 4 devices in preparation for the Microsoft E2 Educators event being held the following week (12th March – follow along live here). I discussed the challenge with my colleague Amit Pawar who was also asked for how best to achieve the required outcomes which were essentially:

  1. Office365 ProPlus needed to be installed (with latest version to support inserting 3D Models into PowerPoint)
  2. Minecraft:Education Edition installed
  3. Paint3D (meaning at least the Creators Update of Windows10, otherwise would need to install it via the Microsoft Store)

Not knowing what state the devices would show up in meant we had to make some assumptions, so we prepared a handful of USB drives with the ‘Click 2 Run’ O365 installer (along with a .bat file to execute the install), along with the Minecraft:Education Edition Win10 Installation file.

After returning from the visit to Tanglin Trust School on Friday morning, we found to our dismay that the units had still not arrived meaning we were going to be severely pressed for time. When they did eventually arrive mid-afternoon it was evident our original plan above was not going to work. The devices all had various versions of Windows10 installed on them, different versions of Office365 with multiple language packs (but not the latest version that included the support for 3D models in PowerPoint) and other gremlins that suggested the devices were not going to be the most functional.

The Solution – Making Lemonade

Surface
Some of the Surface Pro needing configuring

It became clear that a Plan B was going to be required to get these devices ready in the very short period of time that we had available and so Amit and I conferred and decided we would need to change tact. Our solution was to:

  1. Create a demo tenant here – https://demos.microsoft.com/ – this gave us temporary demo licenses for M365 A3 and A5 meaning we had temporary O365 ProPlus and Intune liceneses.
  2. Map a domain name to the demo tenant to make it easier to use (fortunately, my forward thinking colleague had a spare one handy).
  3. Create sixty demo user accounts in the Tenant using Excel and FlashFill
  4. Download the ISO and create Windows10 installation USB drives. Fortunately, being in Singapore there is a local Microsoft Data Centre only a few kilometers down the road meaning it did not take long to download the ISO. I had my ‘always travel with’ USB of Win10 so we could get a head start with that one.
  5. Amit then configured Intune for Education in the demo tenant to automatically push out Office365 and Minecraft: Education Edition to any users who signed into the Tenant that were connected via AzureAD and Intune and were licensed appropriately (see step 1 above).

Configuring the above did not take long, with the biggest wait being having Windows 10 reinstalled on the Surface Pro devices.  When the first couple of devices were complete they presented us with this screen in the Windows10 setup steps:

setup-for-personal-use
We chose to “Set up for an organisation” meaning we could automatically enroll the devices into Intune

By choosing the first option of “Set up for an organisation” we were presented with the option to sign in with an email address and password where we used the user names we created in step 3 above. Because the users all had AzureAD P1 and Intune Licenses they were automatically enrolled into our demo tenant (based off the domain name of the email address) and then the magic started to happen:

Office365 ProPlus applications and Minecraft:Education Edition started to immediately download to the device with no need for any further intervention. Intune For Education took over and recognised the configurations of Amit had set up and automatically pushed out the applications to the correct users.

We could then test the first few devices to ensure that Minecraft:Education Edition could be signed into and that when launching PowerPoint it had support for the 3D Models and as an added bonus, the user was automatically signed into Office365 and activated it based off the temporary demo licenses in the tenant – there was no need to manually activate Office.

Selling The Dream – The Lemonade Stall

At this point, I may be stretching my analogy around life, lemonade and lemonade stalls, however what excited me about this was it proved, in a real-world time-sensitive and under pressure situation, that the modern device management (MDM) dream can work very effectively. Intune for Education and AzureAD worked exactly as intended meaning once the initial configuration was completed, it was as easy as signing into the devices with one of the demo user accounts to complete the deployment. In the end, I had to leave at 5:30pm to catch a flight home out of Changi Airport and my colleagues all had other events to get to. As a result, they had to come in on the Saturday morning to finish the re-installation of Windows10 which was the longest part of the whole process, and then simply sign into the freshly installed Surface Pros with the new user accounts and wait a few minutes for the download and installation of Office365 ProPlus and Minecraft:Education Edition to complete.

This was a very satisfying solution and conclusion to a busy week and a great example of ‘eating your own dog food‘ (if you’re not familiar with this curious phrase, have a look at the explanation here).

Categories
Microsoft365

Microsoft Teams Adds Guest Access

A really exciting announcement this morning from the MSFT General Manager Lori Wright – Guest Access is now available!

Read the official release here.

This is far and away the most requested feature from schools that I’ve encountered and given the enormous growth in usage of Microsoft Teams since it was released six months ago, I can see Guest Access contributing to even more usage. Here’s an interesting infographic of usage so far:

Teams 1.png

It is worth nothing, however, that this is not unrestricted guest access at this stage. From the blog release:

Beginning today, anyone with an Azure Active Directory (Azure AD) account can be added as a guest in Teams. That means anyone with one of the more than 870 million user accounts—across Microsoft commercial cloud services and third-party Azure AD integrated apps—can be added as a guest in Teams.

This actually caught me out as I saw on Twitter first thing this morning that Guest Access had been released so I immediately logged into my demo O365 Tenant and signed into Microsoft Teams, inviting my personal email address of #######@mcneill.co.nz. Sure enough, I received the invite:

Teams 2

However, when I attempted to authenticate into the Team it didn’t work. The reason for this is because my @mcneill.co.nz domain email is hosted (and has been for ten years) on Google Mail services i.e. not using Azure Active Directory (AAD). It looks like this will be rectified in future releases with support for signing in with a Microsoft Account (MSA):

Later, we’ll add the ability for anyone with a Microsoft Account (MSA) to be added as a guest in Teams. If the guest doesn’t have an existing MSA, they will be directed to create a free account using their current corporate or consumer email address, such as Outlook.com or Gmail.com.

This authentication is being managed by Azure B2C which I blogged about previously, which provides the host organisation with a lot of very granular control over how and what users can access within the host tenant.

From an education perspective, there is a world of opportunities for guest access, with the following being the first off the top of my head:

  • Inter-school collaboration for professional development (this is particularly relevant in New Zealand with the development of the Communities of Learning or CoLS)
  • External experts are used for professional development of staff or additional teaching of students. Remember, Meet Now allows video calls directly within Teams.
  • Adding Parents or Caregivers into a Team for seamless communication between school and home
  • School partners/suppliers who deliver services could be added to a Team for easier communication

Teams 3

I’ve blogged about a few times about Teams and could be worth checking out if you’re new to these:

While many schools do use AzureAD, some are 100% Google Cloud accounts and therefore, as in my example above, they won’t be able to sign into Teams at this stage. There is, however, a good work around for this using AzureAD Single Sign On (SSO). This requires the primary identity of students/faculty to be managed out of AzureAD but then allows for the configuration of SSO into G Suite accounts in only a few minutes. This is probably the easiest way to usher in Google Schools to using Teams at this stage.


The Kuia Cloud – Musings On Te Reo

Maori Language WeekThis week Aotearoa New Zealand celebrates Te Wiki o Te Reo Māori or Māori Language Week. This is an important cultural week for all New Zealanders as we collectively work towards preserving the taonga (treasure) that is our native language. If you’re wondering about the relevance of my blog post as “The Kuia Cloud”, please do persevere and keep reading as it will become evident (kuia is Māori for elderly woman or grandmother). As an added word association, Aotearoa literally means “land of the long white cloud” so we are perfectly situated to build out a Granny/Kuia Cloud!

In my previous role, I helped organise a Digital Treasure Hunt for students to encourage them to kōrero Māori (speak the Māori language) and after visiting the beautiful Orakei Marae last week with the Microsoft kia rite kick off, my mind has been whirring again around the importance of promoting Te Reo. I admit that this has a personal interest too, with my oldest daughter having now competed twice in the Ngā Manu Kōrero speech competition (you can read her 2017 speech here) and she has expressed a desire to progress her Reo competency so she can become more fluent.

The challenge is, her current secondary school does not offer any tuition in Te Reo and I’ve been using my wider Professional Learning Network to explore options to support her (and to some extent me!) in learning more of the Māori language. It was all of this triggered some long dormant memories of mine about the work of Sugata Mitra and his “hole in the wall” project in New Delhi. If you’re unfamiliar with this, then this summary is a good read, but the key part is as follows:

In early 1999, some colleagues and I sunk a computer into the opening of a wall near our office in Kalkaji, New Delhi. The area was located in an expansive slum, with desperately poor people struggling to survive. The screen was visible from the street, and the PC was available to anyone who passed by. The computer had online access and a number of programs that could be used, but no instructions were given for its use.

What happened next astonished us. Children came running out of the nearest slum and glued themselves to the computer. They couldn’t get enough. They began to click and explore. They began to learn how to use this strange thing. A few hours later, a visibly surprised Vivek said the children were actually surfing the Web.

The findings from this “experiment” led to Mitra delivering an award winning TED talk about his thoughts on the future of learning and his views that students directing their own learning was a critical pathway forward in education. He promoted this with his idea of Schools In The Cloud – have a watch of the following TED talk to learn more:

The extension of Schools In The Cloud was “The Granny Cloud.” Mitra quickly realised that for the illiterate children of the slums of New Delhi, without English even their best learning through playing/experimenting with a computer would inherently be limited if they did not understand the global language of English. To remedy this, he started to build out “The Granny Cloud”, the idea being that retired people (often grandmothers) would give up their time on Skype to simply have conversations with these children and through practicing spoken conversational English, they would improve their opportunities in life.

So far, so good.

The Kuia Cloud

kingi
Kingi Tawhiao Potatau te Wherowhero Credit.
So I’m wondering aloud whether something as simple as building a Granny Cloud could be replicated in New Zealand, this time using the kuia (elderly woman) and koro (elderly man) to be the support network for people of any age wishing to learn how to kōrero Māori. Undoubtedly the internet is shrinking our world and being able to connect more or less instantaneously to speakers of the Māori language significantly reduces the barriers to entry for learning the language. My daughter wrapped her Ngā Manu Kōrero speech around the following whakatauki (proverb)

ki te kāhore he whakakitenga ka ngaro te iwi (without foresight or vision the people will be lost)

Further on in her speech she talked about the challenges faced in New Zealand over the years with declining numbers of people able to speak Te Reo:

Another major period of Māori history when this whakatauākī, without foresight or vision the people will be lost, was highly applicable was in the 1980s, when it became widely recognised that Te Reo Māori was dying out. Yes, dying out. Prior to this, there had been years of Te Reo being banned in schools and Māori children being punished for speaking it, which in turn led to some parents not teaching their children Māori because they didn’t want their children suffering at school the way they did. If this had continued, who knows how close Te Reo could have come to extinction- it might have even happened, but for a few groups of individuals who were in possession of some foresight. Two initiatives that began in the 1980s to try and revive Te Reo Māori were the Kohanga Reo movement and the Kura Kaupapa.

It would seem to me that perhaps a further opportunity exists now to couple Technology and Te Reo together and build out a “Kuia Cloud” – a network of volunteers who would be willing to give up some of their time to kōrero Māorwith those interested in learning more of the language. In doing so, this would demonstrate the foresight and vision that Kingi Tawhiao Potatau te Wherowhero talked about in the mid 1800s and further help preserve this taonga which is absolutely unique to Aotearoa (New Zealand).

I am not sure where to go from here with this idea, although two things do come to mind:

  1. Share this idea and blog post as widely as I can, starting with the #TeReo hashtag on Twitter where incredible educators like Te Mihinga Komene regularly support people with their questions around Te Reo Māori
  2. See if there is anything that the company I work for (Microsoft NZ) can do to help build a network or provide the technology to make this happen. Skype is a Microsoft product and there are a few different versions of this service, and Microsoft NZ has long worked with and supported Dr Te Taka Keegan to add more Te Reo into Microsoft products.
    1. One idea could be creating a Microsoft Team that could host the Kuia / Koro Cloud as this would allow additional resources to be utilized (although it would need to wait until the feature of adding External Users is available).

Conclusion:

If you’re reading this during Te Wiki O Te Reo Māori 2017  (or even afterwards) and would like to be involved in some capacity, feel free to reach out to me. The three easiest ways would be:

  1. Drop a comment in the area below – I’d love to hear from you!
  2. Ping me on Twitter – @samuelmcneill
  3. Connect with me on LinkedIn – my profile direct link is here

Much like the revival of ANZAC Day dawn service attendance from people across all generations, there is a growing number of younger people who are keen to learn Te Reo Māori. Just possibly, through the application of foresight and vision, along with a healthy dose of technology, we can connect these eager students with those that would be only too eager to pass on their aroha (love) for Te Reo Māori.