Categories
Microsoft365

Office365 Groups Going Private By Default

365Groups.jpgFor some readers, this will be an obscure ‘technical post’ on something that they never have to worry about in the course of their work. For those who read this and have Office365 administrative responsibilities then they may well exclaim “at last!” and rejoice over their morning coffee!

The ability to set Office365 groups created in Outlook as “private” by default was the third highest user request on UserVoice and the team have responded:

Based on your feedback, we are updating the default privacy setting for groups created across all five Outlook endpoints (web, PC, iOS, Android, and Mac) to be private by default where only approved members can see what’s inside the group. For customers that want to continue with the existing behavior of public by default (where anyone in your organization can see what’s inside) we are providing an Exchange Online PowerShell cmdlet to define the default value. This update will gradually rollout to all Outlook endpoints in the coming months starting with Outlook on the web.

There is a more detailed breakdown of this change from Tony Redmond that I encourage you to read:

Click here to read Tony’s thoughts on O365 Groups going private

Tony rightly points out that sometimes it is Education customers that drive the need for change:

Microsoft is doing well with Groups and Teams in the education market, especially in the U.S., and it is unsurprising to see them respond to these customers by making groups private by default.

Having worked in schools and now supporting them with their O365 setups, I’ve heard of more than one story where teachers have created a group to share “teacher only” content, only to learn it was public and students were able to see it. This default setting change is going to go some way towards preventing this from happening and bring O365 Groups more in line with MS Teams default settings which are private (with Team members needing to be explicitly invited to see content).

This link is a good resource from Microsoft giving the current status of private vs public for the various O365 services and will be updated regularly. Right now, it looks like the following:

O365 Groups
The above will change regularly. Click here for latest details

For those that don’t like change, there is of course the option to stick with the status quo and use PowerShell to keep groups public at an organisational / Tenant level:

How to change the default setting of Office 365 Groups for Outlook to Public or Private

If your organization wants Office 365 Groups for Outlook to be created as Public by default (or Private), use this PowerShell cmdlet syntax:

Set-OrganizationConfig -DefaultGroupAccessType Public

To set to Private:

Set-OrganizationConfig -DefaultGroupAccessType Private

To verify the setting:

Get-OrganizationConfig | ft DefaultGroupAccessType


Categories
Microsoft365

Retention Policies In Office365

I’ve been having a few conversations recently with both partners and school leaders about what to do with accounts after staff leave. I’ve learnt that some immediately delete them (often resulting in lost data that is subsequently deemed useful), while others have a series of manual processes or scripts to suspend the user and then delete them.

Ideally, the best option is to use the Retention Policies feature that is part of the Office 365 Security and Compliance Centre. The real benefit of a Retention Policy (and you can have multiple policies) is that you can largely “set and forget” once implemented and safely rely on content for departed staff to be retained (archived) for a defined period of time or even indefinitely if required.

Retention Policies can apply to a range of services within O365, including:

  • Exchange email
  • SharePoint sites
  • OneDrive accounts
  • Office365 Groups (applies to content in the group’s mailbox, site, files, OneNote, and Team conversations. Support for content in Planner, Yammer, and CRM is coming soon)
  • Exchange public folders

Additionally, any content that is retained can be searched via e-Discovery, similar to this example I gave about Teams, meaning if an investigation was required content can be quickly searched and emails or documents can be restored.

Retention.png
Understanding what takes precedence when it comes to Retention Policies

I can see that schools may well choose to have different policies for different types of staff such as:

  • Retain forever: Principal, Chair of the Board of Trustees (if assigned a school email), Executive Officer, Financial Controller
  • Retain for ten years: Heads of Department / Faculty; Pastoral Care Staff (Deans, Deputy Principals etc)
  • Retain for five years: Teachers, administrative staff

Each school will have their own ideas and different countries will have relevant regulatory obligations to comply with as well.

It is important to fully understand how Retention Policies work because there are some features that may not be immediately obvious. For instance, once a policy is applied it is effective immediately, not just when a staff member leaves.

A retention policy can both retain and then delete content, or simply delete old content without retaining it.

If your retention policy deletes content, it’s important to understand that the time period specified for a retention policy is calculated from the time when the content was created or modified, not the time since the policy was assigned.

delete policyWith the policy on the left that will delete content older than 7 years. If a teacher had created an awesome PowerPoint eight years ago that they used every year to teach a key concept to their classes, then this would actually be deleted because the retention policy has (correctly) identified it as having been created more than seven years ago and therefore it should be deleted.

Schools need to therefore carefully consider their business cases for retaining content before applying any Retention Policies and perhaps reserve some of these for inactive users (i.e. staff that may have left the organisation and been moved to a different OU in Active Directory). Reviewing this guide around Inactive Mailboxes in Exchange is also very useful to see different scenarios.

In my experience, this level of thinking within schools is often lacking and consequently there can be considerable frustration and even financial loss as a result of not being able to track back through staff electronic content. For this reason, I do strongly encourage school leadership teams to spend some time thinking through their requirements and then providing a clear set of guidance to their IT administrators who can then implement simple and efficient Retention Policies to securely protect data within the provided guidelines.

Read here for Retention Policies Overview for O365 Administrators

Categories
Microsoft365

Using AzureAD Groups To Quickly Populate Microsoft Teams

Microsoft Teams is the new digital classroom platform from Microsoft and I’ve already reviewed the key features recently here, but if you’re unfamiliar with it here is the official overview video:

I have recently been asked by a few secondary schools and tertiary institutes what is the quickest way to populate students into a Team. You can, of course, use the official Student Data Sync tool which will take information from your Student Management System (SMS) and populate the relationship between teachers, students and classes in a very tidy way (full guide available here)

However, if you’re after a super quick way and you’re already using AzureAD Security Groups then it’s a 5 second job to add all your students into a class. Follow the instructions below to learn just how easy it is!

Teams2
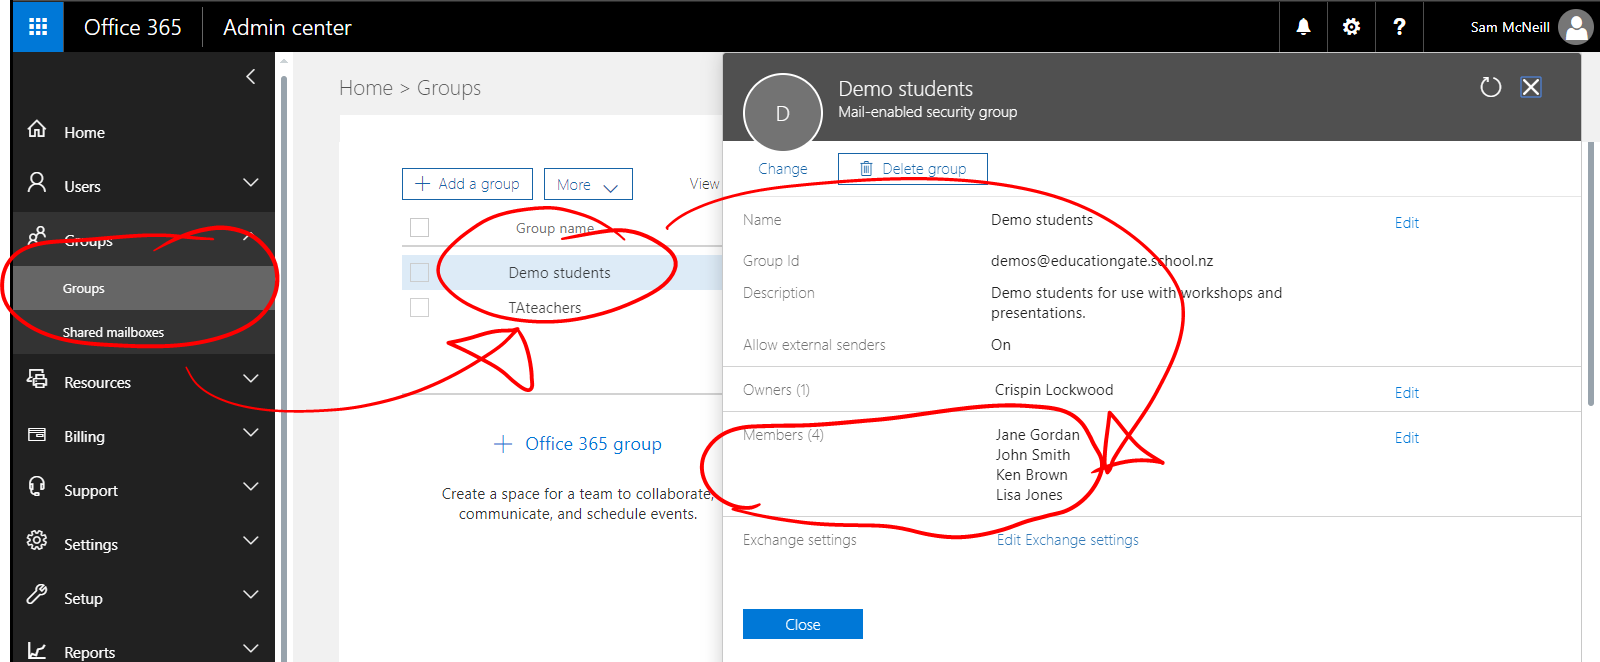
You need to start by looking at your existing Groups in the Admin Portal and making sure that you have one that reflects the students/teachers that you want to add to your Team. In the above example this is a mail enabled security group called “Demo Students” with an alias of demos@educationgate.school.nz
Teams1
Next. go to your Team in question and by clicking on the Team name (in the above example, 11 History) you will see in the above example there are only three members of the team: 1 owner and two members.  You will also see the “Add Member” option on the right
Teams3
Once you have clicked “Add Member” will have the chance to add either individual students/teachers by searching for their name directly OR you search for your AzureAD Group name – in this case “demos”. You need to select this and hit “Add”
Teams4
Note that it automatically recognises that there is four members of the group and that it will add each of these members to your Team in one go.
Teams5
Confirmation that all four members from the AzureAD Group “demos” have been added to the team.

This is a real time saver for situations where schools are already using AzureAD to populate Groups with their students/teachers. In these examples, you can add an entire class of students as easily as adding a single student.

UPDATE: A keen reader reminded me that the above method is a one time import of the Members of the AzureAD Group – it will not keep them in sync if the membership changes dynamically (to achieve this, SDS is the better option). So the above is certainly a time saver in situations where you want to do a one off import and are prepared to add/remove additional members manually at a later date.

Categories
Microsoft365 Windows 11

Are You Migrating To OneDrive For Business Or Not?

OneDrive-forBiz_rgb_EN_Blue.png

I read an interesting blog post this morning entitled “No You Should Not Be Migrating to OneDrive for Business” and I encourage you to check it out, including the excellent infographic at the bottom of the article that helps understand what a potential migration might look like (unfortunately, I can’t include the image here as hosted versions of WordPress.com don’t allow iFrame embeds).

Whilst the title of the post is certainly attention grabbing, especially coming from a Sharepoint favouring website, it’s worth noting that the author DOES advocate the use of OneDrive For Business but goes into depth to explain it’s not just a simple sync tool. This is the key overview:

OneDrive for Business is a new “brand”, powered by SharePoint, that helps you work with your files, at work.

Here’s what this product or brand includes:

  • Personal Site
  • Personal Document Library
  • A Sync Tool for every Document Library so you can work Offline
  • Perspective on your working files (Shared with You, Followed by You, etc…)
  • Perspective on your Group Files

I am talking to more and more schools that are keen to abandon their local network shares in favour of using a combination of cloud storage in Office365 including:

  • OneDrive For Business
  • Sharepoint Online
  • Office365 Groups

It can become confusing and hard to know which tool to use and when. The above article, linked to again here, definitely provides some worthwhile insights for organisations looking to maximise the value of their Office365 cloud storage options.

Categories
Microsoft365

Professional Learning Communities Groups in Office365

office-365-fi-625x321Back in mid-2016 Microsoft released PLC Groups for Office365 and I have to admit, I completely missed this feature release.

You can read the full announcement on the official Office365 blog post here.

I guess I’m pretty excited about this for a few reasons, primarily because it links into the professional development model that is increasingly being adopted in New Zealand schools – that of Professional Learning Groups (PLG) using inquiry based models. Certainly, at St Andrew’s College where I was the Director of ICT for the last five years, this was adopted back in 2012 and resources for these groups would typically use a OneNote or a Moodle course to collate resources over the period of the inquiry. Whilst this was fine, it was always a pain to keep track of group members and making sure that everyone was being included in group messages. The official blog post above highlighted some of the challenges as well:

  • Teachers can be isolated, time is severely limited and collaboration is difficult.
  • Professional collaboration tools are disconnected and don’t always support meaningful, sustained collaboration.
  • A challenge for many PLCs is extending the work and relationships in the times and spaces between physically coming together.
  • It can be difficult for new teachers to ramp up.
  • Information is often stored in personal spaces as opposed to one common place that can benefit others.
  • New members need to better understand the journey, story, exploration and history of a PLC, its activities and areas of inquiry.

To address these short comings, the following features are available in these O365 groups designed especially for educators:

  • Inbox for group email communication, including Connector for connecting your group to Twitter and following topics or Twitter handles that interest your PLC group.
  • Calendar for scheduling group events.
  • Document library for storing and working on group files and folders.
  • OneNote notebook for taking project and meeting notes.
  • Planner for organizing and assigning tasks and getting updates on project progress.

What is not listed above, but has huge value for me, is the ability to add guest members to your PLC group. What this means is that teachers/experts (or even parents) who are outside of your O365 tenant can be invited on their personal email address and they only need to activate this address as a Microsoft Account, to be able to sign into the O365 group and contribute.

professional-learning-community-groups-in-office-365-education-2
Screenshot from the Professional Learning Communities shared OneNote with guidance on how to run the inquiry.

This opens up a huge range of possibilities for schools where there is likely to be inter-school professional inquiries taking place. In New Zealand, this could be the Communities of Learning which connect different schools together in the same geographical region. To be able to use a shared inbox group and calendar to co-ordinate meetings (either in person or via Skype) as well as a central location for all documents shared (either uploaded or simply attached via emails through the group) and a OneNote means the key tools to promote a successful inquiry are all in one place and accessible to every member, whether they are at the same school or not.

The experience of the Omaha Public Schools District using PLC is shown below:

Last week, Darrell Webster hosted a virtual meeting with a number of people to discuss how PLC work and the effectiveness of them in schools. There are a few technical glitches at the start of the meeting but it’s worth watching past these to see the quality discussion. Attending the meeting are:

  • Darrell Webster  (host) and Microsoft MVP award winner since 2013 and self described “Office365 Enthusiast”
  • Krish Gali, Product Manager for Office 365 Groups
  • Robert Dickson, Executive Director at Omaha Public School
  • Rachel Chisnall MIE Expert and teacher at Taeri College, Dunedin
  • Morgan McKeen MIE Expert and teacher at Parnell District School, Auckland

My Thoughts On This:

There’s a lot to like about PLC Groups in Office365, not least that it reflects that Microsoft is continuing to actively invest into technologies that improve the way in which teachers manage their growing administrative workload. A few other highlights for me (in no particular order):

  • The PLC group OneNote comes pre-populated with templates to assist teachers with their inquiry and smooth running of the Professional Learning Groups.
  • Guest Access – it’s hard to overestimate how valuable this is. Too often schools are dealing with disparate groups of people and being able to link them all into the one-stop-shop of resources is incredible.
  • Central Access – the PLC group is not owned by any one individual teacher, but instead is part of the school’s O365 Tenant meaning that if one teacher leaves the school or is no longer involved in that particular PLC, the resources are not locked down preventing others from getting access to them.
    • Similarly, this means that if a PLC inquiry is likely to be a multi-year group, staff can come and go but all the previous resources, conversations and research is maintained and accessible.
    • Additionally, the staff member in charge of professional development can be added as a member to all PLC groups and can see progress and add comments etc at anytime ensuring full transparency.
    • Again, having a single email address to email all members of the PLC means there are no excuses for accidentally excluding a staff member from a vital communication!
  • Connectors – in particular, the ability to add Twitter and follow users or hashtags means the PLC can extend their reach and pull in valuable resources directly into the PLC group – priceless. I became a Twitter convert back in 2014 and wrote a lengthy blog explaining why teachers should use Twitter to grow their Professional Learning Network
  • Planner – this is a simplified GANT chart type organisational tool, very similar to the popular Trello. It’s a great addition to the Office365 tool box and you can read more about it here. I’d certainly encourage teachers that are already using Trello to consider migrating to Planner given the deep integration into O365 that it offers.

So there you go – don’t make the same mistake I did and overlook the value of the Office365 Professional Learning Communities groups; they will definitely find an indispensable place in your school.