


This post has a few sections in it so you can jump to the section of most interest to you:
- Microsoft Account (MSA) vs Work or School Account (Organisational Credentials)
- Create Local User On Windows 11 Home During OOBE
- Upgrading Windows 11 Home To Pro / Enterprise / Education
- Create Local User On Windows 11 Pro During OOBE
- Where Do I Get My Upgrade Keys?
- Final Thoughts
I’ve been working with a few customers recently that have been receiving devices with Windows 11 Home Edition and wanting to create local users on the device. Their feedback to me is that it has become increasingly more difficult to do this over successive versions of Windows updates as Microsoft clearly tries to drive users to sign in with a Microsoft Account (MSA). A quick point of clarification:
Microsoft Account (MSA) vs Work or School Account (Organisational Credentials)
- Microsoft Account (MSA)
- This is the personal user accounts that Microsoft offers and is not related to your work/school in anyway. Historically, these were well known domain names such as @live.com, @hotmail.com, @outlook.com, @xbox.com etc. These allow you to sign into various Microsoft services as well (email, Bing etc) and, of course, Windows devices during the Out Of Box Experience (OOBE) during start up for the first time.
- It’s worth noting that you can use a custom email address as your MSA which is both handy, but can lead to confusion. For example:
- You could create an MSA with your Gmail address if you wanted e.g. first.last@gmail.com. Even if you set your password for your MSA the same as your Gmail account it would not actually be authenticating against Google, you just happen to have mirrored the username/password.
- You may have inadvertently created an MSA the same as your work or school email address (and if you’re a fan of a single password for all services you’re in for a bit of fun!). This would mean your MSA might look like first.last@your-school-name.edu and if you were around in the Microsoft Live@Edu days (pre-O365) this was actually quite common.
- Work or School Account
- This is essentially your organisational account connected to either an on premise Active Directory or the cloud identity services from Microsoft EntraID (previously called Azure Active Directory)
- These are useful for signing into managed Windows 11 devices or other organisational provided services (increasingly, work/school are integrating these credentials to deliver Single Sign On (SSO) services to third party services as well).
With that out of the way, on to the challenge of adding local users to Windows 11 Home/Pro!
Create Local User On Windows 11 Home During OOBE
As mentioned, successive updates to Windows 11 Home have made it increasingly hard to create a local user during the OOBE start up as you’re channeled down the pathway of signing into the device with your MSA.
For the record, I’m totally in favour of using an MSA on Windows 11 Home (or a Work/School account on Windows 11 Pro or above) for signing in because it’s not great having local users on devices where passwords can be forgotten. At least with an MSA there are password recovery options available.
It used to be that you could turn off the wifi connection on the device and this would force Windows to allow you to create a local user instead as the device was tricked into thinking there was no internet connectivity. This is no longer a possibility, as during the OOBE wizard you’re prompted to sign in or create an MSA:

If you remove the network connection you’re no longer prompted to create a local account, you’re simply asked to reconnect:

Even exploring the “Sign-in options” looking for a local user do not offer you this:

Now, there is a ‘hack’ that many internet users have identified as working – if you sign in with your MSA account and use a bogus account of “a@a.com” or “no@thankyou.com” (with any password combo you wish) it seems to throw an error and allow you to create a local user:

An error is then presented suggesting this account is indeed a valid MSA but has been used too many times with a wrong password and has been locked out and gives you the chance to create a local user instead:

If you click Next you’re prompted to create a local user:


I call this a ‘hack’ because it’s clearly not the intended signing in process Microsoft wants users to do and there is no guarantee this will continue to be available if those accounts were closed down by their owners or Microsoft but, for now, if you really do want a local user on a device this works.
The other alternative to creating a local user on a Windows 11 Home is to go through the OOBE and sign in with a legitimate MSA and then create a local user account from Windows Settings and then sign out of your MSA and sign back in as the new local user account you created. Guides for creating this local user account are here:
Create a local user or administrator account in Windows – Microsoft Support
Upgrading Windows 11 Home To Pro / Enterprise / Education
The other alternative to avoid the above ‘hack’ is to upgrade your Windows 11 Home device to a higher version that does support the creation of a local user during the OOBE setup. You’d need to have a valid license key to upgrade the device during the OOBE but the process itself is pretty straightforward.
When you turn on your Windows 11 Home device for the first time the OOBE kicks off and you see the option to select your country:
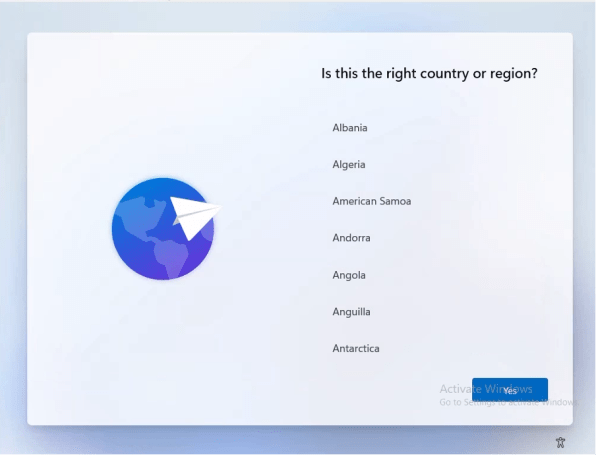
At this stage, hit “Shift+F10” to launch the command prompt and type “changepk.exe” and hit enter:

This launches the Windows GUI for Activation Settings where you can select “Change Product Key”

You are then prompted to enter your Windows upgrade product key:

This will then reboot the device and kick off the slightly different OOBE for Windows Pro (see below).
Where Do I Get My Upgrade Keys?
If you’re an M365 subscriber as a workplace/school then you historically got these keys from Microsoft’s Volume Licensing Service Centre (VLSC) however this is now being deprecated as VL keys are moving to the M365 Admin Portal, but there is a key piece of info here to understand:
- A VL Key administrator must be an admin user in the M365 Admin Portal, AND
- The VL Key administrator must still be registered in VLSC to be able to see these keys in the M365 Admin Portal (the email address / user must match in both VLSC and M365 Admin Portal
If you’re not registered at the VLSC but will be the person managing VL keys in the M365 Admin Portal reach out to your licensing provider and they can trigger a registration email sent to you from Microsoft to kick off the VLSC registration. It will look something like this:
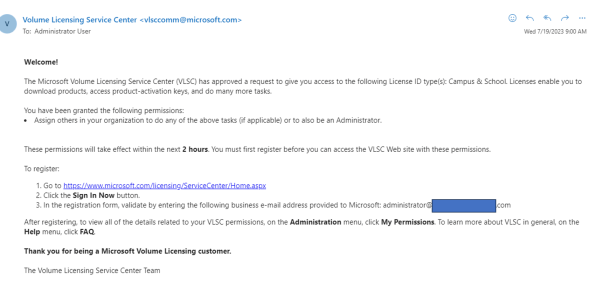
Note: it can take up to 24hrs before this registration is activated and you can start seeing the VL keys in the M365 Admin Portal.
This second step is something many users are unaware of and even if they’re a Global Admin in the M365 Admin Portal wonder why they can not see the VL Keys there – they must still be registered at VLSC with the same email address. Once this happens, they can log into the M365 Admin Portal and navigate to Billing >> Your Products >> VL Keys where a search can be done for Windows keys e.g.

Note that you can export all key into a CSV file or can copy the key as per the red arrow above.
With your Windows 11 Home device now upgraded to Windows 11 Pro (or above) you can complete the OOBE and create a local user through the setup.
Create Local User On Windows 11 Pro During OOBE
The initial steps of the OOBE wizard for Pro is very similar to Home – choose your location, language, keyboard settings etc, but then you get presented with a new option, to set up for personal use (signing in with an MSA) or setting up for work or school (where the device would be joined to a local domain or EntraID (formerly, AzureAD):

Given we don’t want to replicate the MSA challenges of Windows 11 Home, you need to select “Set up for work or school” and progress. You’re prompted to enter your work/school email address which would kick off the cloud EntraID join and enrolment into Intune, but that’s not what we want to do in this instance so choose “Sign-in options”:

Unlike Windows 11 Home there is a new option presented to complete a Domain Join instead:

When this is selected, you’re now given the option to create a local user:

And then create a memorable password:

Followed by password prompts, showing you’re in the process of creating a local user on the device:

Final Thoughts
I’m a passionate advocate of a ‘managed device’ as I believe that increases the chances of it being secured and ready for work/learning, so I try to guide all my customers away from creating local users on devices in virtually all instances. With that said, I acknowledge there are some scenarios where customers are wanting to create local users for various reason and this blog shows some ways of achieving that through the OOBE process.
My prediction is that Microsoft continues to close loopholes and ‘hacks’ that allow for non-MSA users to be created during the OOBE process for Windows Home, so what I’ve outlined above using ‘a@a.com’ or ‘no@thankyou.com’ is not something I’d recommend users rely on. Instead, the upgrade pathway to Windows 11 Pro (or Enterprise, or Education) during OOBE is a better option and provides the user with both an EntraID Join (formerly an Azure AD Join – AADJ) or the ability to create a local user if you select “Domain Join” during the OOBE process.
Finally, if you do sign into a device during OOBE with your MSA or work/school account and decide you want a local user instead, you can create these via the Windows Settings: Create a local user or administrator account in Windows – Microsoft Support. This is probably the most compliant method of achieving a local user for Windows Home devices.
If you know of any other ways to create local users during OOBE feel free to drop it in the comments below!


