Categories
General

Waitangi Weekend 2024 Rambling

Regular readers of this blog will have noted a few more posts around bikes and bikepacking creeping in amongst the education and technology posts I usually share. This is going to be a shorter post with mainly some images of a bike ride I completed today on the first day of the Waitangi Weekend.

It’s hard to believe that it’s been three years since I did my first Waitangi Weekend bikepacking trip (on an Ebike that day) – you can read about it here Waitangi Weekend eBike Wandering – February 2021 – SamuelMcNeill.com – and that was the first time I ventured forth on a camping expedition on a bike. Since then I’ve done quite a few, both by myself and with friends. You can read about them here if interested.

I’ve spent this last week following the progress of riders on the Tour Te Waipounamu, an amazing bikepacking race from Cape Farewell at the top of the South Island to Slope Point at the very bottom, a journey of 1330km and 21,000m elevation. Incredibly, the winner completed this in a mindblowing 4 days and 19hrs! Inspired, I decided to head out on by own bikepacking bike for a longer ride today. Here are a few photos of the ride.

Lined up against a row of poplar trees, my green Soma Wolverine blended right in early on in the ride – almost as if it was in stealth mode:

Inside Bottle Lake Forest is a small hill, covering some rubble from collapsed buildings from the 2010-11 earthquakes in Christchurch. As I rode onto the top the sky looked vaguely threatening with low cloud stretching out to the horizon and a yellowish light:

At one point you emerge from the forest and bike near the beach. The tide was high and gently lapping on the beach – there was no one around and it was an incredibly peaceful for a quick photo:

After exiting Bottle Lake Forest I continued on towards the Brooklands Lagoon. This was another area where the earthquakes destroyed a lot of residential houses and now there are few residents who live there. I biked around the lagoon where many birds were flying around or swimming on the water:

I turned west at the river mouth and started heading up the river towards the bridge, catching some views of the swift flowing water:

After crossing the Waimakariri River and cruising through the river town of Kaiapoi, I headed back towards the coast and Pines Beach to join the Pegasus Trail to take me north. I’d previously tried to bike along this once before but it was flooded. Today, the track was in mint condition and with very few people around I was able to enjoy the solitude and beauty of the forest trails:

The Pegasus Trail carries on to Waikuku Beach, but I hooked a left into the town of Pegasus that has a feature man-made lake in the middle of it. Around the lake are miniature beaches with golden sand shipped in and laid down. It was looking very beautiful today:

In the middle of the lake is an island with an artificial waterfall in it that can be reached by a suspension bridge. I didn’t ride out to it today, but snapped this shot:

I grabbed some lunch in Pegasus at around the 50km mark feeling very happy with the ride so far. I headed back to town and through Kaiapoi, crossing the Kaiapoi River at the cute Mandeville bridge:

I continued south and over the Waimakariri River again, this time I headed right of the bridge and further up the river. Some of the trails were a little overgrown at first, including a tree that had fallen over the path at one point:

As I pushed on, things got progressively slower as the path became less defined:

It was slow going on this grass, with some deep ditches under the long grass that I was careful to avoid as they had the potential to throw me over the handlebars! And then, all of a sudden, the path just stopped:

Faced with the prospect of returning back the way I had come or doing some bush bashing to try and get through to the stop bank, I chose the latter. I had to hike a bike through 30-50m of thick bush and then up the stop bank but achieved it without too much difficulty, before heading west into a growing head wind and rain squalls atop the stop bank that is designed to capture and block the water from the Waimakariri when it floods. At various points there were entry points back to the river from stopbank:

This was around the 70km mark and I estimated I still had around 30km to get home, including going through McLeans Island Forest. Amid intermittent showers, the sun emerged lighting up the dry grasses with some spectacular views:

The remainder of the ride took me back behind the airport and home, clocking in at just under 97km for the ride. If you’re interested in the route, check it out on Strava:

I enjoy these longer rides – I deliberately didn’t aim to go fast today and I encountered many different surfaces: roads, gravel, dirt tracks, sand, overgrown grass. My bike took them all on and I saw some beautiful sights on the ride today. It’s a great way to clear your thoughts and forget about daily responsibilities and just enjoy the simple process of pedalling and moving from one place to another.

I did not have a set route for this trip, got lost at one point but with a general idea of the directions I wanted to head I was able to enjoy a very fun day out.

Categories
General Off Topics

Off Topic: My Soma Wolverine “Do Anything” Bike

My pride and joy – the Soma Wolverine custom build

Update 7th November 2022

I completed my first overnight bikepacking trip with this bike over the weekend. It was a heap of fun and I’ve written a review, included the route and some photos of the trip and gear I took if you’re interested here: 24hr Bikepacking Adventure – November 2022 – SamuelMcNeill.com

The Background

Whilst this blog is mainly about EduTech, I do occasionally post off topic, anything from historical reflections on ANZAC soldiers, through to one of my most popular blogs I’ve written about buying my first eBike and the thought process that went into it. I even have a series of pages dedicated to outdoor adventures I’ve gone on.

Given the interest in my bike posts, I am going to share a new one today about my first custom built bike – a Soma Wolverine v4 Type B frame which the team at Soma describe as an “Adventure/MonsterCross”. Going on they say:

The original inspiration for the Wolverine was “monster cross”, but it is seriously so much more. Its geometry is stable enough for off road touring, but sporty enough for all-around adventure and gravel riding. With its sliding dropouts, you can run single-speed, derailleur gearing or hub gearing. With a split seatstay, it is compatible with the Gates Carbon Belt Drive.

Wolverine (v.4.0) Type-B (Adventure/Monstercross) | Soma Fabrications

And in that last sentence is the clue to why I chose this frame to start the build. My Riese & Mueller eBikes are both using the Gates Carbon Belt Drive system and I’ve found that this is has been a super low maintenance alternative to a traditional chain drive. In my eBike post I opined that whilst I was happy with the Enviolo internal gear hub, I’d really love to get a Rohloff:

On the upside, the Enviolo is virtually maintenance free and is a masterclass in engineering (if I had my time again, I’d choose the Rohloff e14 Speedhub for a wider gear range but still internally housed)

Reflections On Owning A Riese & Muller SuperCharger 2 eBike – SamuelMcNeill.com

So when it came to building this custom bike I was going to start with the drivetrain first:

  • A Rohloff Speedhub
  • A Gates Carbon Belt

Naturally this would narrow the options of a frame as I would require that split seatstay to be able to insert the belt – enter the Soma Wolverine v4 Type B

Omafiets Sydney – An Excellent Build Partner

A couple of local bike shops recommended this frame for what I was wanting to do in terms of building a bike that would be a “go anywhere, do anything” type of bike but unfortunately the supply was non-existent in New Zealand. After an online hunt I discovered Omafiets in Sydney who responded that they had my size in stock and were happy to ship it as is. Given how helpful they were I started an email dialogue and then a phone call followed to dial in precisely what I was wanting.

I can not speak highly enough of the team at Omafiets – they were super engaged, happy to answer a million questions I had, seemed to “get” my vision for what I wanted, and totally humoured me on the finer details I wanted for this bike. On an early phone call they said “we don’t mind if there is another 50 emails back and forth whilst you get the exact spec you want” …. I laughed saying it would not take that, but in the end it must have been close and the team there were super patient and happy to answer any questions I had.

The final build was stunning – even if I do say so (photos below were taken by the team at Omafiets after the build was completed to let me see how beautiful it looked):

I live in New Zealand, so after the build was completed, Omafiets boxed it up and my sister brought the bike over for me when returning for our parents’ 50th Wedding Anniversary celebration (shoutout to Air New Zealand taking bike boxes as extra baggage for $70! Definitely cheaper than couriering it here)

Key Components

Some other features of the custom build that I was super happy with on the finished product include:

  • Rohloff Speed Hub (red)
    • Alongside the Gates Carbon Belt, this was the foundation of the bike build and I knew I didn’t want the plain black hub. Getting it in red started somewhat of a trend for other speciality components on the bike….
  • Brooks B17 leather saddle
    • Once broken in, these saddles are meant to be super comfortable. I can attest to this from my Pashley Sovereign bike that had a Brooks and I loved it. They require a little extra care, but you get the benefit of it.
  • Son Dynamo (red anodized)
    • I’d read a lot about the pros and cons of a dynamo hub and whilst I doubt I’ll do too much multiday adventuring where I would not be able to get access to a power plug at some point, I wanted to add something in on the off chance. Additionally, from my eBike experiences I loved having a power source for a front light without ever having to think about charging batteries for the light.
  • Son Edelux II (red anodized)
    • I was originally thinking about an alternative front dynamo light but this was where working closely with Omafiets again paid off – their team suggested the Edelux since it came in matching red and really started to make the color scheme pop!
  • Sinewave Cycles Reactor (red anodized) – USB charging port in stem
    • I had seen other USB charging ports for bikes but most were quite ugly with cables visible. I loved how this one was inserted into the top of the stem and was very discreet. The fact in came in shiny red really had me at first sight! I’ve tested this and even at low speeds of 10-20kph it accepts plenty of charge from the dynamo and charges devices quickly.
  • HT Components Nano Pedal (red)
    • I had not initially thought about custom pedal colours but as more splashes of red were making their way into the build I reached out to Omafiets and they sourced and recommended these ones. I felt it could be a bit indulgent, but so glad I went with it and many people comment on how great they look.
  • Surly Moloko Handlebar
    • This is a pretty unusual looking bar but was again recommended to me for a custom bike build, offering various handgrips as well as mounting points for bags and cameras. Having ridden the bike on one 100km ride so far, I can definitely attest to the comfort of the various positions on this handlebar
  • Panaracer GravelKing SK TLC with brown walls (running tubeless)
    • I am not a tyre specialist at all, but the team at Omafiets guided me expertly towards these based on my intended riding, providing a combination of good grip with high rolling speed for mixed terrain riding. I’ve been surprised by the compliments from others “in the know” about the tyre choice – seems like Omafiets know their stuff!

The rest of the componentry I largely took the expert advice from Omafiets (and glad I did) who helped me settle on a very cool, very custom, one off bike for me.

Some Photos From The Road

The bike is pretty new still and I’ve done a nudge over 300km on it, with one 100km ride so far loaded up with about 80% of my camping kit:

I am planning to head away on my first overnight bikepacking trip with a friend this weekend actually so will update this blog post with some additional details (UPDATE: here’s the review from the weekend – 24hr Bikepacking Adventure – November 2022 – SamuelMcNeill.com).

Final Thoughts

I love this bike, it’s lively and fun to ride, can go long distances at a steady pace, climbs well, is stable on descents and looks great of course (beauty being in the eye of the beholder of course!). I have some multi day bikepacking rides lined up for this summer and will know more about it’s overall performance then. One aspect I was a bit nervous about was pulling out the back wheel in the event of a puncture. Even though I’m running tubeless it will need to be done at some point and my experience of removing the Enviolo and belt on my eBike was a bit of a mission,

Fortunately, I have a friend who is a bike mechanic and volunteers additionally at Recycle A Dunger, a community project in the heart of the city where they provide free bike maintenance advice/repairs and try to upgrade donated bikes for others to buy at affordable prices. I popped in and saw him this week at RAD and he showed me how easy it was to get off the rear wheel – even easier than my traditional derailleur bikes!

Ultimately, I wrote this post for others that might be thinking about custom builds, want to know more about the Soma Wolverine (I did a heap of searching and there were not that many reviews on it) or simply just love bikes as much as I do! Hope this was interesting!

Categories
eBike General

Off Topic: Bikes, Gears & Out Back & Beyond

I really like bikes.

Any sort of bike, really, and I find riding them good fun, good for my physical and mental health and good for seeing both new places and viewing familiar ones from a new perspective. I also really like thinking about new bikes that I might one day get and I’m in the thick of that at the moment in terms of considering my first ever custom build of a “do it all” adventure / light touring non-electric bike.

One of the things I’m needing to think through is the gearing of the new bike to ensure there are enough low gears to crawl up some of the massive climbs in New Zealand with camping gear and me included! I’m currently considering the Soma Wolverine v4 Type B frame that would look a little like this, but I’d not go for the drop bars:

The reason I’d go for the Type B frame is I really want to use a Rohloff Speedhub internal gear hub with a Gates carbon belt drive. I already have some experience with internal gear hubs and belt drives on my first eBike – read about this here. What I’m less familiar with is the gearing ratios I’d need and how to translate these from my existing derailleur / cassette drive trains into the 14 geared Speedhub.

Enter the Bicycle Gear Calculator website – pure brilliance.

My Existing Bike Drive Trains

Cannondale Synapse Roadbike:

  • 34/50T Chain Ring
  • 11 speed 11/32T Cassette

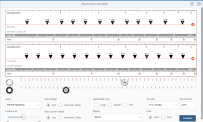
I can visualise this on the Gear Calculator here and it looks like this:

Specialized Turbo Levo Comp Alloy eMTB:

  • 32T Chain Ring
  • 12 speed 10/52T Cassette

I can visualise this on the Gear Calculator here and it looks like this:

With this configuration you can see the eMTB has much lower gearing and much higher jumps between the lowest gears (36T to 42T to 52T). So whilst it doesn’t have the same top end speed as a roadbike (as you’d expect) it should get you up steep climbs with far less effort.

When I’m not outside on the road I often ride Zwift on my Wahoo Kickr Bike in the garage:

There are many cool things about this training bike but two quite unique features:

  • It can accurately simulate gradients, both climbs and descents making for very realistic riding. When riding virtual worlds in Zwift or riding courses from my Garmin Edge 530, the bike automatically goes up and down based on the gradient on the ride – cool!
  • You can configure any group set you have on your bikes – in my case Shimano and SRAM. This is because there is no physical cassette on the Kickr Bike, but instead a weighted flywheel and belt drive will simulate the different gearing configurations you may choose. Up until now, I’ve always just mirrored the Shimano gearing on my Cannondale Synapse, but today I did something a bit different.

Comparing Rohloff Speedhub with SRAM 10/52 Eagle Cassette

The really clever thing about the Bicycle Gear Calculator website is that it allows you to compare two different hubs, meaning I could take the known configuration of my eMTB and compare it against a prospective Rohloff Speedhub I might get in the future with the Soma Wolverine.

Here is the comparison on the Bicycle Gear Calculator website and it looks like this, using a Rohloff Speedhub with a 46T Chain Ring and a 20T rear cog – the SRAM eMTB is at the top (unchanged) and the Rohloff Speedhub is at the bottom:

The Rohloff has 14 evenly indexed gears, and because there is 540% gear range you can see that the lowest and highest gears are ever so slightly lower and higher than the SRAM configuration – incredible! The cool thing about the Bicycle Gear Calculator website is that you can slide the Chain Ring and Cog up and down to immediately see the impact of different tooth configurations if you need lower/higher gearing ratios.

So, I’d been able to establish in theory that a Rohloff Speedhub with a 46/20 configuration would likely be geared pretty similarly to my eMTB which, believe me, absolutely flies up hills – thanks to it’s amazing motor! What I could not easily test is what it would be like riding a bike like that up real hill climbs without the motor assist. Then I had a brainwave.

Wahoo Kickr Bike + Garmin Course Routing = (Virtual) World Test

I remembered that you could change the gear ratios on the Wahoo Kickr bike and I wondered if I could accurately replicate the SRAM set up on my eMTB. To this point, I’d always run the Shimano 2 by 11 that my Cannondale was using which was 2 Chain Rings (34/50T) and 11 gear cassette (11/32T):

There was no SRAM Eagle cassette configuration in the Wahoo Kickr app, so I was going to need to rely on the custom configuration setting which meant I was going to need to find the actual number of teeth on each cog in the cassette – something I was able to track down here:

The jump from the 42t to the 50t cog equates to a 19 per cent jump, while shifting from the 42t to the 52t cog on the latest cassette increases this to a 23.8 per cent jump. Lower down the block (from the 10-42t cogs), the steps remain the same (10, 12, 14, 16, 18, 21, 24, 28, 32, 36, 42, 52t).

SRAM gets one up on Shimano with new 52-tooth Eagle cassette – BikeRadar

Equipped with this information, I was able to recreate my SRAM eMTB gearing by manually entering in each cog size:

At this point, I was starting to feel pretty pleased with myself but now I needed a realistic course for riding the new gear configuration on my Wahoo Kickr Bike. I’d recently completed “The Three Sisters” on Zwift that has 3 of the 4 largest climbs in Watopia (898m elevation over 48.5km) and had done this on my standard Shimano configuration:

Whilst repeating this would have given me a better understanding of relative effort between the two gearing systems, I really wanted something a bit more real world, something that might simulate a ride I’d do if out bikepacking. I decided to create a route near me that would start in Diamond Harbour, bike around to Purau before setting off up the first climb of 434m and down into Port Levy, before climbing again, this time 671m exiting Port Levy on the way to Little River.

A total climb of 1131m in a little over 30km would definitely be a good test of the gearing setup, with the first climb being 5.06km and an average gradient of 9% and the second 7.5km with an average gradient of 8% according to Garmin’s ClimbPro calculations. I’m not the lightest rider by any stretch and on my road bike, in real life, that would be something that would be a little daunting and I’d definitely know a hard ride in the saddle was looming! On my eMTB with boost assistance it would be fine – the big unknown was how it would feel with my eMTB SRAM gearing ratios and my legs providing all the power!

In the end, honestly it was pretty easy:

You can safely ignore the downhill speeds because Garmin doesn’t account for corners or sanity, simply power + decline = speed!

So, it was not fast going up by any stretch, and I sat mostly in gears 1-5 for the climbs. Even though the averages were 8% and 9% respectively, these ranged from 6% to 20% in places. I tried to imagine whether I could have done these climbs on a bike with camping gear and I concluded I likely could have. My max heart rate was only 164bpm with an average of 141bpm which was pretty low given the 1100 total elevation and shows just how much difference the gear ratios made.

Similarly, a max power output of 328w is quite low with average of 196w shows it was hardly a strenuous ride. By comparison, here’s the Three Sisters data (less steep and less total elevation but it did have one sting in the tail going up to the Radio Tower):

Clearly, both higher max/average for power and heart rate showing it was a much harder ride than what I did today with the Garmin route and the SRAM gearing on the Wahoo Kickr Bike.

Final Thoughts

I was super pleased to realise I could virtually simulate any gearing combination on my Wahoo Kickr Bike allowing me to test various things before ever considering purchasing them. It was also interesting to learn via the Bicycle Gear Calculator that a 14 speed Rohloff Speedhub has almost identical top and bottom gear ratios to the 12 speed SRAM Eagle gearing on my eMTB if I used a 46/20 configuration with the Rohloff. Knowing I could tweak that further to go even lower if needed was reassuring, and Gates has a useful calculator on their website that allows you determine what length carbon belt you’d need to match your chain ring and cog combination.

So whilst I’m no closer to buying my dream custom build bike, I do feel like I’ve at least ridden it virtually up 1100m of climbing on local hills and would have a reasonable sense of how it would feel on those climbs. Of course, the Wahoo Kickr doesn’t take into consideration the weight of the bike (and any gear strapped to it) when determining the resistance on the inclines, but it does take my weight from Garmin to make it realistic in terms of effort/power and resultant speed up the hills.

Riding with super low gearing today did mean it was a slow ride up big hills, especially compared to my road bike, but sometimes that’s ok. Riding is meant to have different experiences and being able to ride consecutive days with big elevation climbs is important for longer, multi-day rides.

Lastly, this is all new to me – if you’ve got experience and knowledge on gearing ratios and have spotted errors in how I’ve calculated this, please do feel free to drop a note in the comments below to help me learn.