


Well, not exactly. It is Friday, but I’ve not gone fishing or phishing, but have certainly been brushing up my skills on the latter. I’ve shared previously one of my favourite IT posters on phishing and last week shared some infographics on how to have discussions with students and educators on spotting phishing attacks and after some recent conversations with customers around phishing protections in M365 I wanted to share a few things today for others to benefit from.
As this post has grown in length, you can jump to the various sections of interest by clicking below:
- Introduction
- Exchange Online Protection (EOP)
- Defender for Office365
- Safe Links & Safe Attachments in Defender for Office365
- Attack Simulation Training – Last But Not Least
- Final Thoughts
- Useful Links From Microsoft Documentation
If, after reading this, you’re keen to trial Defender for Office365 for 90 days at no cost, you can sign up for trial licenses in your tenant here.
Introduction:
According to CertNZ phishing is:
Phishing is a type of email scam. The sender pretends to be a trustworthy organisation — like a bank or government agency — in an attempt to get you to provide them with personal information, particularly financial details.
https://www.cert.govt.nz/individuals/common-threats/phishing/
Phishing emails often ask for:
- your credit card information
- your internet banking details
- personal information and documents, including drivers licence and passport
- usernames or passwords for your online accounts, including social media accounts
I was also prompted to write this blog after reading this interesting article LastPass breach: Hackers put malware on engineer’s home computer to steal their password | ZDNET which included this comment which surely must be one of the understatements of the century:
Following the incident, LastPass says it “assisted the DevOps Engineer with hardening the security of their home network and personal resources”.
LastPass breach: Hackers put malware on engineer’s home computer to steal their password | ZDNET
Interestingly, and pleasingly, LastPass were implementing stronger MFA technologies from MSFT in the wake of this attack:
LastPass has upgraded its multi-factor authentication (MFA) by applying Microsoft’s conditional access PIN-matching MFA, and the company is now rotating critical and high-privilege passwords that were known to the attackers, to reduce the chance of an additional breach.
LastPass breach: Hackers put malware on engineer’s home computer to steal their password | ZDNET
The reality is, no organisation is immune from attacks and we should all adopt a stance of humility and learning as there are many educational benefits of studying the misfortune of others who have been fooled by a phishing or malware attack. In particular, the education industry is by far and away the biggest target/victim as shown by Microsoft’s global threat tracker, consistently showing 80% or higher of the malware encounters in the last 30 days:

Microsoft does provide a range of malware, spam and phishing protections for Exchange Online users through both Exchange Online Protection (basic) and more advanced features in Defender for Office365. SE Labs also recently named Defender for Office365 the best email security service for 2023: Microsoft named Best Email Security Service of 2023 by SE Labs – Microsoft Security Blog
For an overview of the differences click here:

It’s also worth noting that the configurations for all of these settings have been moved into the Microsoft Defender security administration portal and out of the Exchange Online administration portal:

Exchange Online Protection (EOP)
To understand how mail is processed, I do find this flow diagram from the official documentation helpful:

It’s at the content filtering stage that phishing and spam detection kicks in.
To configure the anti-phishing policies, head to the Security Admin dashboard and navigate to: Email & Collaboration –> Policies & Rules –> Threat Policies –> Anti Phishing. For the more visual:


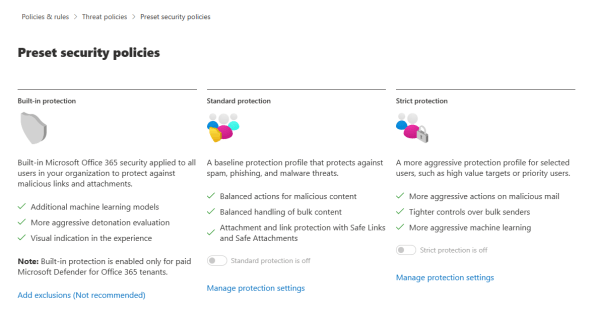
One thing worth being aware of (as I missed it on the first run through) is that there are actually some preset security baseline policies that are worth enabling as a starting point and I suspect many organisations don’t have this on by default:

You have two baselines to choose from in the EOP licensing:

I’d recommend organisations turning on this preset security policy as a starting point to improve their defenses against phishing attacks.
Now, back to the main anti-phishing policies, like any policy in M365 you set the policy and then decide which users/groups this will apply to. By default, there is a policy already created for your tenant by Microsoft:

By clicking on it, the configuration pane opens on the right hand side showing your current settings and you have a choice to edit the protection settings and the actions:

It’s worth noting that with EOP licensing you only have the Spoof Intelligence option to turn on/off – learn more about what this is here. It is under the “edit actions” that you have a few more options and I’d recommend turning all of these on:

The First Contact Tip is actually one of my favourites and shows up when a recipient receives a message from someone for the first time or on an irregular basis and is a visual cue warning to pay extra attention to whether the message appears legitimate or not. The tip bar looks like this:

The “Show via tag” is also a helpful one, although perhaps requires a bit more understanding from the recipient as to why this matters. As per the settings tip it states:
Choose if you want to apply a “via” tag in Outlook (chris@contoso.com via fabrikham.com).
The warning here is that someone may be trying to spoof your company’s domain name to appear to be an internal employee when in fact they’re sending from an external domain provider. There are some legitimate reasons for this behaviour:
- Legitimate scenarios for spoofing internal domains:
- Third-party senders use your domain to send bulk mail to your own employees for company polls.
- An external company generates and sends advertising or product updates on your behalf.
- An assistant regularly needs to send email for another person within your organization.
- An internal application sends email notifications.
- Legitimate scenarios for spoofing external domains:
- The sender is on a mailing list (also known as a discussion list), and the mailing list relays email from the original sender to all the participants on the mailing list.
- An external company sends email on behalf of another company (for example, an automated report or a software-as-a-service company).
Note: The default rule is always on – you can not choose which users/groups it can apply to, however if you want a custom policy to apply to only some users or groups, then you can do this at the time of creation:

So you can see that Exchange Online Protection anti-phishing settings are pretty quick to configure – simply because there are not many of them! Which brings us to Defender for Office365 and the more advanced features:
Defender for Office365
Requires additional licensing such as Office365 A5 or M365 A5, or Defender of Office365 P1/P2. Want a free 90 day trial license? Obtain these by clicking here.
A helpful way to understand what is included in the Defender for Office365 P1/P2 plans is contained in the awesome m365maps.com, a great website that I’ve blogged about before. The key components are:

This link has the key differences and features that are only available in Defender for Office365 for phishing protection (compared to EOP) and the two major differences are:
- Impersonation Settings
- User impersonation is the combination of the user’s display name and email address. For example, Valeria Barrios (vbarrios@contoso.com) might be impersonated as Valeria Barrios, but with a completely different email address.
- Domain impersonation is where the sender’s domain is visually close to the organisations: e.g. microsoft.com is impersonated as micr0soft.com.
- Advanced Phishing Thresholds
- Allows you to configure the aggression level of detection based on the confidence of the phishing detection through four stages from standard through to most aggressive.
One of the other differences is a third option around Security Presets – reminder that with EOP you only had two, neither of which were on by default. With Defender for Office365 there is a third option of “built in protection” only for licensed users:
To configure these additional settings, go to the Anti-Phishing settings as above and this time when you edit Protection Settings there are many more choices, with the first choice being the aggression level with a simple slider:

After that, you can configure the impersonation settings (including both users and domains):
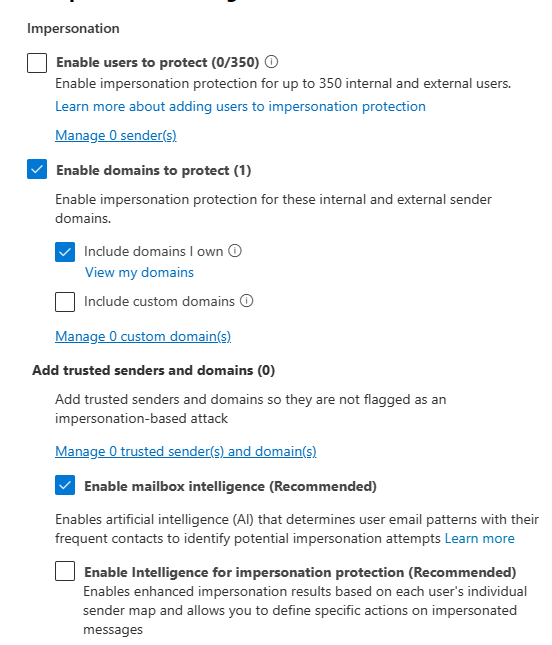
It’s worth reading the documentation on impersonation settings here as there are some nuances here around the way it works but a key understanding is:
When you add internal or external email addresses to the Users to protect list, messages from those senders are subject to impersonation protection checks. The message is checked for impersonation if the message is sent to a recipient that the policy applies to (all recipients for the default policy; Users, groups, and domains recipients in custom policies). If impersonation is detected in the sender’s email address, the action for impersonated users is applied to the message.
Anti-phishing policies – Office 365 | Microsoft Learn
The idea with impersonation settings is that you would apply them to authority figures in the organisation that most people would respond to any request from without thinking. For instance, if the CFO emailed asking for financial information most people would comply and provide the details. Therefore, adding the impersonation rules to CFO’s account (there is a limit of 350 per organisation) makes complete sense. That way, any inbound email that has an approximation of CFO’s name/email address will have warning tips applied through the actions if there is a match:
Impersonation safety tips
Impersonation safety tips appear to users when messages are identified as impersonation attempts. The following safety tips are available:
- Show user impersonation safety tip: The From address contains a user specified in user impersonation protection. Available only if Enable users to protect is turned on and configured.
- Show domain impersonation safety tip: The From address contains a domain specified in domain impersonation protection. Available only if Enable domains to protect is turned on and configured.
- Show user impersonation unusual characters safety tip: The From address contains unusual character sets (for example, mathematical symbols and text or a mix of uppercase and lowercase letters) in an sender specified in user impersonation protection. Available only if Enable users to protect is turned on and configured.
With more protection settings comes more actions in terms of handling identified phishing attempts, based on spoof protection or impersonation attempts:

Options include routing to junk/quarantine, re-routing the email to a dedicated safety email address, delete the message or add a Bcc address. Additionally, of course, there are the extra safety tips and indicators for user/domain impersonation based off this licensing.
A final reminder: you can have granular policies based on users/groups and customise the levels of protection/aggression of filtering as well as custom actions based on who the intended recipients are. One instance might be if you’re getting a user who consistently “falls” for phishing attempts despite all tips/education, you might choose a more aggressive action for that user and simply delete those emails before they ever see them!
The other major benefit with Defender for Office365 to protect against phishing attacks is Safe Links and Safe Attachments.
Safe Links & Safe Attachments in Defender for Office365
Safe Links is a super helpful feature and is described in documentation as follows:
Safe Links is a feature in Defender for Office 365 that provides URL scanning and rewriting of inbound email messages in mail flow, and time-of-click verification of URLs and links in email messages, Teams messages and other locations.
Complete Safe Links overview for Microsoft Defender for Office 365 – Office 365 | Microsoft Learn
Safe Links will protect users for any links they click in email, Microsoft Teams and Office documents. Configuration is very similar to the anti-phishing policies above, starting at Threats & Policies in the Security Admin centre

The pane on the right should be starting to become familiar to users now, with the usual “edit protection settings” button required to get access:

Here you can turn on/off the different applications for Safe Links, and note that you can also choose to apply real time URL scanning (recommended) and you can optionally choose to wait for scanning before delivering an email if you wish. There are also configuration options in terms of what happens when a link is clicked:

Instead of “edit actions” for this, you have the option to edit notifications – the message that the end user sees when they click on a link. You can customise this which I recommend because you want to provide as much reassurance to your users that alerts and warnings around phishing are coming from your organisation and not simply random “pop ups”:

Finally, for Safe Attachments:
Safe Attachments in Microsoft Defender for Office 365 provides an additional layer of protection for email attachments that have already been scanned by anti-malware protection in Exchange Online Protection (EOP). Specifically, Safe Attachments uses a virtual environment to check attachments in email messages before they’re delivered to recipients (a process known as detonation).
Safe Attachments – Office 365 | Microsoft Learn
Configuration is in the same area of the Security Centre and applies the same general formula of settings: create a policy, assign it to users/groups.

Known malware is going to already be addressed by EOP filtering/scanning, so what you’re really needing to make decisions on here is how to manage unknown potential malware and you have a range of options. Again, keep in mind the ‘value’ of the target i.e. you may have more aggressive filtering on higher priority targets in your organisation (Vice-Chancellors, Provosts, Principals, Financial, Pastoral Care staff etc) to reduce the chance of a successful attack (whilst increasing the risk of a potential false positive).

For guidance around the best settings please do read the documentation here.
Note: the recommended option is “Block”, however if you’re wanting to not delay any incoming email you may choose Dynamic Delivery which I prefer.
Attack Simulation Training – Last But Not Least
Saving the ‘best’ for last, I want to touch on Attack Simulation Training which is a super cool feature I really like as it focuses on the education of end users inside your organisation which is critical to build a robust defense against phishing attacks. All the ‘smarts’ in the world from a technology perspective can still fail, so training your users to be vigilant in spotting a phishing attack is best practice in my mind. My strongest recommendation is that you advise your users in advance of any attack simulations so they are at least aware this may happen. No employee likes to learn unexpectedly that their employer is running tests against them to look for ‘weak links’ in cyber security. Again, education is meant to be a positive experience and not a punitive one! I suggest you watch the guide video here first:
With Attack simulation training in the Microsoft 365 Defender portal you can run realistic attack scenarios in your organization. These simulated attacks can help you identify and find vulnerable users before a real attack impacts your bottom line.
Get started using Attack simulation training – Office 365 | Microsoft Learn
I am not going to cover this in too much detail, but there are various types of simulated attacks you can run against your users:
In Attack simulation training, multiple types of social engineering techniques are available:
- Credential harvest: An attacker sends the recipient a message that contains a URL. When the recipient clicks on the URL, they’re taken to a website that typically shows a dialog box that asks the user for their username and password. Typically, the destination page is themed to represent a well-known website in order to build trust in the user.
- Malware attachment: An attacker sends the recipient a message that contains an attachment. When the recipient opens the attachment, arbitrary code (for example, a macro) is run on the user’s device to help the attacker install additional code or further entrench themselves.
- Link in attachment: This is a hybrid of a credential harvest. An attacker sends the recipient a message that contains a URL inside of an attachment. When the recipient opens the attachment and clicks on the URL, they’re taken to a website that typically shows a dialog box that asks the user for their username and password. Typically, the destination page is themed to represent a well-known website in order to build trust in the user.
- Link to malware: An attacker sends the recipient a message that contains a link to an attachment on a well-known file sharing site (for example, SharePoint Online or Dropbox). When the recipient clicks on the URL, the attachment opens and arbitrary code (for example, a macro) is run on the user’s device to help the attacker install additional code or further entrench themselves.
- Drive-by-url: An attacker sends the recipient a messages that contains a URL. When the recipient clicks on the URL, they’re taken to a website that tries to run background code. This background code attempts to gather information about the recipient or deploy arbitrary code on their device. Typically, the destination website is a well-known website that has been compromised or a clone of a well-known website. Familiarity with the website helps convince the user that the link is safe to click. This technique is also known as a watering hole attack.
- OAuth Consent Grant: An attacker creates a malicious Azure Application that seeks to gain access to data. The application sends an email request that contains a URL. When the recipient clicks on the URL, the consent grant mechanism of the application asks for access to the data (for example, the user’s Inbox).
To start an attack simulation campaign, head to Attack simulation training – Microsoft 365 security in the Security Admin Centre:

Remember, when you “catch” an employee who is fooled by your attack simulation, be gentle, avoid making them feel foolish and use the process as an educational learning experience.
Final Thoughts
Security patching of devices, spam filtering and other real time protections have become so good that the previous attack vectors to exploit devices are far harder to compromise these days. For this reason, bad actors are turning to human manipulation through ever increasingly sophisticated phishing scams that can fool even the most vigilant users.
Microsoft 365 has some excellent tools to increase your security posture through Exchange Online Protection and Defender for Office365 and I trust that this post has brought some of these to your attention and consideration. There are other healthy things to do around email routing and integrity that I have not covered, such as DMARC configuration (Use DMARC to validate email, setup steps – Office 365 | Microsoft Learn) and it’s important to explore setting these up as well.
I can’t stress enough that regular education of your end users is critical in the fight against phishing attacks. Using the Attack Simulator is a helpful tool, but always do so gently and with an educative approach aimed at helping your users become more effective in spotting attacks.
Good luck!
Useful Links From Microsoft Documentation
In no particular order, some documentation that I reviewed/referenced in this blog post:
- Microsoft recommendations for EOP and Defender for Office 365 security settings – Office 365 | Microsoft Learn
- Exchange Online Protection (EOP) overview – Office 365 | Microsoft Learn
- Configure anti-phishing policies in EOP – Office 365 | Microsoft Learn
- Protect against threats in Microsoft Defender for Office 365, Anti-malware, Anti-Phishing, Anti-spam, Safe links, Safe attachments, Zero-hour auto purge (ZAP), MDO security configuration – Office 365 | Microsoft Learn
- Configure anti-phishing policies in Microsoft Defender for Office 365 – Office 365 | Microsoft Learn
- Anti-phishing policies – Office 365 | Microsoft Learn
- Microsoft Defender for Office 365 service description – Service Descriptions | Microsoft Learn
- Trials – Microsoft 365 security <– 90 day free trial.


