Categories
Microsoft365

Understanding Your File Restore Options In Office365

O365 Restore.png
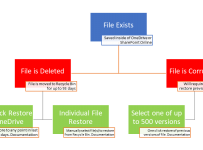
A visual representation of the restore options in Office365

I’ve been asked by a few educational institutes recently how the backup and restore of files works inside of Office365 so I thought I’d collate a few links and try to summarize it in brief in a blog post.

I’ve previously blogged about retention policies which are very powerful and allow administrators to configure granular controls on how documents are retained inside their organisation. Usually based on the file creation date or the last modified date, the retention policies work on the basis of either preventing documents from ever being deleted (i.e. retained forever) or conversely, will permanently delete a file when a defined retention date is reached (the equivalent of a digital paper shredder). Read more about Retention Policies here.

As core functionality, Office365 provides both personal file storage and shared team file storage in the cloud that can easily be synchronized to your local computer, tablet or smartphone. When files are accidentally deleted, corrupted or infected by malware you can restore these quickly using self-service tools inside of Office365.

Restore options are typically determined by whether a file or folder was deleted (stored for 93 days in the online recycle bin by default) or still exists but has changes that need to be rolled back by versioning (500 versions are available by default).

For individual users, personal files and folders are typically stored in OneDrive and a user can self-service restore their entire OneDrive library with a single click from a designated point in time over the last 30 days (for example, if all files were encrypted by a cryptolocker attack). Alternatively, you can choose to restore only selected files and folders that have been deleted from your OneDrive – again, the 93 day period applies here.

Files and folders that are intended for collaboration with colleagues are usually stored on SharePoint Online or in Microsoft Teams for Education, both of which have versioning turned on by default. This creates up to 500 versions of a file by default and any of those can be restored in the event of unexpected content change or corruption. Scenarios where this might apply include accidental deletion / overwriting of content inside the document itself when multiple authors are at work inside the same document, or where an individual file has become inaccessible through corruption or unintended encryption (again, cryptolocker could be a culprit here).

Of course, many organisations have formalized drafting policies around documentation and Versioning supports both major and minor versions of documents that are works in progress.

If the file itself is deleted from SharePoint Online or Teams for Education then it can be restored within 93 days by retrieving it from the Recycle Bin inside of SharePoint Online. I’ve used the word “default” a few times in this blog post because the Global Administrator actually has significant control over how long documents exist in Recycle Bins, how many versions are of documents are retained before the oldest are automatically culled and how Retention Policies work. It’s worth checking with your orgnanisation if you’re working to the defaults (which I’ve listed here) or whether custom policies apply.

Another cloud backup service offered by Microsoft is Azure Backup Services and is for organisations that wish to back up on premise content to an off site cloud location. Some organisations will also choose to backup their Office365 content out of the Microsoft cloud – a quick search online will find third party services that offer this functionality.

I trust this blog post answers some of the questions you may have had about how to restore content inside your Office365 tenant in a simple way, with links back to the core documentation to understand these important features more deeply.

Categories
Microsoft365

Smarter File Restore Feature Lands For Microsoft Teams & SharePoint Online

One question I get asked from time to time is whether schools should be backing up their content in the various clouds they utilize. From an Office365 perspective, there are a number of commercial third party backup solutions available such as Spanning, Veeam and SkyKick amongst others. In terms of first party Microsoft solutions a number of options are in place that can be a combination of:

  • Restore my OneDrive – a great way to restore the entire contents of a OneDrive if something like a crypto-locker attack occurred.
  • Retention Policies – a powerful set of rules that can be customised for any organisation to meet their legal and security compliance around backup and retention of content in Office365.

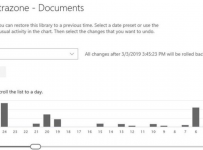
Adding to this, an announcement yesterday has shared that Files Restore for Microsoft Teams and SharePoint Online is being rolled out across April and May 2019. The interface looks familar to those who have used Restore My OneDrive:

SP_Files-Restore_001_main-user-interface

What’s really cool about this is that it is designed to be a self-service recovery tool – in other words SharePoint site (or Microsoft Teams) owners can now restore file/s from any point over the last thirty days by simply selecting the “Restore This Library” option from the cog in the top righthand corner.

SP_Files-Restore_002_main-UISome scenarios where this would be particularly useful include:

  • Accidental deletion of files by an end user
  • Corruption of files
  • Malware infection
  • Encryption by cypto-locker attacks.

It’s worth reminding end users that the content stored in SharePoint sites and Microsoft Teams uses the same ‘backend’ storage: SharePoint Document Libraries. This means that whether you’re working with SPO or Teams you’ve got a common interface for restoring content if required.

My Thoughts:

Every organisation should create their own policy and requirements when it comes to document backup and retention and with the myriad of options available, there is generally something for every budget and security level.

This new feature, rolling out in April/May 2019, means it’s even easier for IT Admins and Site Owners to be able to manage the restoration of critical content if something has gone wrong with certain files. The visual navigation panel showing changes to documents by date will simplify the process of identifying when certain documents were last changed, speeding up the restore process.


Categories
Windows 11

Protect Critical Data With OneDrive & Known Folder Move (KFM)

Despite best intentions, people don’t always follow instructions.

When it comes to saving files, we can all be somewhat guilty of saving to the Desktop or Documents folder when we’re in a hurry with the best intentions to move it into a cloud sync’ed folder structure “when we have time”. The reality is, for many they never get around to it and run the risk of losing critical data.

This is particularly true in a shared device environment like schools where many IT Admins have policies set to reset devices when a user logs out – any content not saved into the Cloud or a network file share is going to be lost.

Enter Known Folder Move with OneDrive

Announced yesterday, this feature has the potential to save a lot of heart ache for users by ensuring their most likely “dumping grounds” for files and folders are automatically saved into OneDrive:

Known folders are global pointers in Windows representing a location on the user’s drive. They help users to organize their most important files and access them across different applications. KFM helps you move your docs, desktop, and pictures into OneDrive. Even the Screenshots and Camera Roll folders are included when the Picture folder has opted into KFM.

So how does this look for the end user? Here is a typical Win10 File Explorer view:

KFM1

With KFM configured you can see the folders now redirect to OneDrive (circled in red) and the Downloads folder is not moved to OneDrive. Furthermore, this is leveraging OneDrive Files on Demand, where you can see the icons beside each folder. The cloud icon shows it’s only in OneDrive, the green tick shows it remains on the device itself (as well as in OneDrive).

KFM2

There are some cool features for IT admins to enable this further including:

  • GPO to allow either guided or silent installs on users devices – here’s the guided screenshot that pops up for users (e.g. students/teachers):

KFM3

  • There is support coming for Intune later this year (phew!)
  • Windows 7/8/10 are all supported with KFM
  • There is a difference between Folder Redirection and Folder Migration, with Migration recommended over Redirection:
    • Folder Redirection redirects a local Windows folder to an equivalent folder in OneDrive but does not migrate any content from the local folder to OneDrive. That’s why folder redirection should only be used on brand new machines that don’t have existing content.
    • Folder Migration redirects a local Windows folder to an equivalent folder in OneDrive and does migrate the content from the local folder to an equivalent folder in OneDrive. Folder migration can be used on brand new or existing devices with or without content
  • Be aware some file types are not supported in OneDrive.
  • If you’ve saved OneNote files locally, there is some advice on how to move them to OneDrive here.

My Point of View:

This is a great feature to add to Windows because data loss remains a significant risk for end users if they’re only keeping files locally on their devices. With increased storage in the cloud for users now, the ability to easily redirect key “dumping areas” to automatically save to OneDrive will not doubt save a lot of users from blushes and heartache.

If you’re an IT Admin in a school this is definitely worth checking out when it is released for you to access.

Categories
Microsoft365

Docs.com – Soon To Be Retired

On Friday 9th of June Microsoft announced that it would be retiring the Docs.com platform, effective as of Dec 15th 2017, at which point all content would be deleted:

docs.PNG
The homepage of Docs.com with the banner advising it will soon be retired in mid December 2017

An in-depth help article is available to assist you with managing the impact of this announcement, including advice for how to migrate your content to other platforms such as OneDrive For Business. Given many school users already have Office365 accounts the following advice is helpful:

For Office 365 Users with OneDrive for Business

We can automatically back up all compatible content to your OneDrive for Business account if your Administrator enables the auto-migration service for your organization (this option is available as of June 19, 2017). If you would like your school’s or company’s Administrator to initiate this process for you, please contact them and include a link to this article.

You can also choose to log in to Docs.com and follow the auto-migration prompts yourself. When the process is complete, you will find all compatible content you had previously published to Docs.com backed up to your OneDrive for Business folders. The original content on Docs.com will thereafter only be available to view, download, and delete.

The help article will be updated after June 19th 2017 with further information specifically for O365 Administrators so they can support their users.

Microsoft is encouraging regular users of Docs.com to explore SlideShare.net as the recommended replacement platform for sharing content publicly.

slideshare.PNG

SlideShare was acquired by Microsoft as part of LinkedIn.com  and allows users to sign in with either their LinkedIn or FaceBook profiles to start sharing and commenting on the platform. From the announcement article:

Following Microsoft’s acquisition of LinkedIn, SlideShare has joined the Microsoft family, and represents the ideal platform for publishing your Word, PowerPoint, and PDF content with its audience of 70 million professionals, and vast content library

There is six months remaining before the retirement of Docs.com and the subsequent deletion of all content on it. If you’re a regular user of the service it is time to get thinking about backing up your content to OneDrive for Business and migrating your public content to SlideShare.

Categories
Microsoft365

School Is Finishing – How Do I Keep A Copy Of My OneNote Class NoteBooks?

One of the most common questions that I get asked my students and teachers is “How do I keep my Class OneNote Notebooks when the school year finishes?” It’s a legitimate query given this was pretty easy in a non-digital age: you simply walked off with your ring binder folder or exercise book.

In a new blog from the OneNote Team, they have explained a new way to effectively save a copy to your personal Microsoft account so you always have a copy of your class notes. Here’s how to do it:

  1. Sign in to OneNote Online, our web version of OneNote.
  2. From the Notebook list, click Class Notebooks to display all your Class Notebooks.
  3. Right-click to select a Class Notebook and then select Save a copy.

OneNote Save a copy 1

Right-click a Class Notebook and select Save a copy.

  1. Click Next. You are prompted to sign in to a consumer Microsoft account. If you don’t have one, go here http://www.live.com to sign up.

OneNote Save a copy 2

That’s it! Your OneNote Class Notebook is copied to the consumer OneDrive and is available for you to use elsewhere.

On the blog, future developments are hinted at as well:

This is just the initial rollout of the Save a copy feature. In the near future, we will add the ability to choose any notebook type, not just Class Notebooks. We will also roll out the Save a copy feature to your own OneDrive for Business, which will allow students to save a copy of their Class Notebook from a teacher’s OneDrive for Business to their own OneDrive for Business.

If you’re a school leader please make sure you share this feature with your students so they can ensure they’ve kept a copy of their work.