This morning I’m writing this blog as I work from home on my MacBook Pro as I need to take my son to a doctors appointment over lunch. It’s this sort of hybrid/flexible working situation that has become increasingly common over the last few years and I’m fortunate that I have both a supportive employer that allows this, as well as technology that makes it possible for me to work seamlessly from my home.
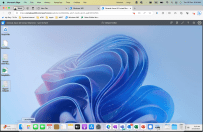
My MacBook Pro is managed by Intune, my default browser is Microsoft Edge with an Entra ID (formerly AzureAD) work profile on it securing access to work resources in M365 and most importantly for this blog post, I also have a Windows 365 CloudPC accessible through my work browser on my Mac:
A screenshot of my MacBook showing my Windows 365 CloudPC running in a tab of Microsoft Edge giving me a full, native Windows 11 experience when I need it.
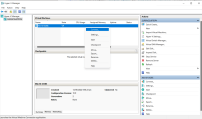
Most recently, I’ve been using Hyper-V virtual machines hosted on my Windows 365 CloudPC for customer testing:
I’ve blogged previously about my Hyper-V set up, and it was easier for me to continue that on a Windows 11 device than replicating it locally on my MacBook. When working with customers more familiar with a Windows 11 environment, having immediate access to the same OS on my primary machine is incredibly helpful and also means I can run Windows only applications when required securely on my CloudPC. The specs for this CloudPC are:
Just as my MacBook is, this Windows 365 CloudPC is configured and managed by Intune meaning the same corporate baselines are applied protecting both the OS and the content stored on it. I’m heading to Europe at the end of the year for a holiday and whilst I don’t intend to do any work (and won’t be taking my work MacBook with me) if something critical happened and I needed access to work resources I know I could access this Windows 365 CloudPC from a device and have a secured experience to complete any work necessary and my employer could have confidence I was not using a local device from a friend or internet cafe with possible data leaks or compromise risks.
The Windows 365 eBook
This morning I received a copy of the Windows 365 eBook from Microsoft that reminded me of this series of Azure virtual desktop blogs I’m writing and prompted this blog post. You can read a copy of it below in full. I thought I’d share a few take away thoughts from this short document (it’s a 6 minute read).
The Changing Landscape of Work
Microsoft’s messaging to IT Decision Makers (ITDM) is that in a world of increased uncertainty and change, you need to have technology that can support remote/hybrid working effectively in any location and on any device. They share some research data that over half of fully remote employees are considering a shift to a more hybrid work setup and that similarly over half of hybrid employees are considering going fully remote:
In my view this is not going to work for every industry, but certainly many information workers are able to work effectively from various locations and it becomes an increasing consideration for employers how they can deliver that flexibility whilst still meeting their security and compliance requirements around access to sensitive corporate data (see this blog post for more thoughts). I lived through the devastating Christchurch earthquakes of of 2010-11 when much of the central city was laid waste and know first hand how disruptive it was for many businesses, including schools and universities, that could not get physical access to their work locations.
A photo showing the dust rising over Christchurch immediately after the February 22nd 2011 earthquake – Image Credit.
Things had clearly moved forward significantly in the following decade as workplaces shut down again with the global Covid19 pandemic but I still know of large businesses and Government departments that had not fully implemented an effective remote workplace strategy or lacked sufficient numbers of laptops to give to staff who primarily used desktops in their workplace to complete their work. It’s in these scenarios that a secure CloudPC would shine. While I referenced information workers above, Microsoft has a grander vision of where the Windows 365 CloudPC can support a spectrum of roles:
The Only Constant Is Change
Windows 365 helps organisations provision secure Cloud PCs for a variety of job types – including full-time employees, consultants, temporary workers (like product-testers and interns) and mobile teams – no matter if they’re remote or in-person. Windows 365 can be effectively deployed to information workers just as easily as it is to frontline service workers and shift workers.
Security Will Be A Key Determining Factor For ITDM Whether To Embrace CloudPC
I recognised the convenience of having a virtual CloudPC on Windows 365 earlier in my blog post in terms of working from home, running Hyper-V or using Windows-only applications, but I believe one of the key considerations ITDM will have in mind with this type of solution is security, something outlined in the eBook as follows:
Saving Time & Gaining Efficiencies Through CloudPC Deployments
The other core benefit I see here is the ease and efficiency of deploying larger volumes of devices – using Microsoft Intune to configure the specs and settings of Windows 365, an IT Administrator can use the tools they already know for managing their existing physical devices to easily deploy Windows 365 devices, be it a single device for a temporary contractor, or hundreds of CloudPC for every staff member in an organisation if an emergency necessitated working from home on their personal PC or tablet. I acknowledge the eBook is Microsoft marketing material so take the following numbers as you will, but they suggest efficiencies gained are:
40% cost savings when using Windows 365 compared to on-premise VDI or Desktop as a Service (DaaS) offerings
75% reduction in endpoint configuration times
25% reduction in new software deployment times
The Differences Between Windows 365 & Azure Virtual Desktop
A number of customers have asked me about the difference between Windows 365 (W365) and Azure Virtual Desktop (AVD) and at the most simplistic level, it’s helpful to understand that W365 is a subscription based license with fixed monthly costs, no matter how much you use it but with correspondingly less configuration options over the virtual device. On the other hand, AVD is a consumption based model with almost endless configuration options and you pay for what you consume.
Beyond that simple difference, the eBook does provide a helpful comparison chart which was one of the more useful things in the eBook:
Closing Thoughts
After nearly seven years running Windows 10 and Windows 11 devices as my primary working machine, I’m enjoying being back on macOS with my MacBook Pro and experiencing the changes that have happened to the OS since I last used it regularly. However, I use my Windows 365 CloudPC almost every other day for various tasks related to my work and having the flexibility to work across OS is very empowering.
I have talked with a number of CIO in organisations who are actively evaluating the role of CloudPC in their device fleet strategy, with some running pilots with identified users already. I don’t see this trend changing as long as there are requirements for mobile, hybrid and remote working scenarios for employees.
Drop me a line if you’d like to talk more about this or check out https://www.windows365.com to see Microsoft’s information on CloudPC.
I sometimes get asked how I experiment and learn new things with Microsoft Endpoint Manager and trial specific features or functions for customers and partners. I long ago adopted using virtual machines for rapid testing and I thought in this blog post I would show how I configure my testing environment with Hyper-V Virtual Machines.
I confess, I needed to rebuild these this morning as I recently rebuilt my Windows 11 laptop and forgot to save my Hyper-V snapshots of my test devices and therefore I lost all my virtual machines – not great practice! As this post is quite long, I’m going to create a quick table of contents below to let you jump to the relevant section you want to view quickly:
I’m using a Surface Laptop 4 with Surface Dock and 2x external displays to make it easy to see both my virtual machines, Microsoft Documentation and the Endpoint Manager Admin Consolse, and here are the specs from Windows Settings of my device:
Device name SurfaceLaptop4 Processor 11th Gen Intel(R) Core(TM) i7-1185G7 @ 3.00GHz 3.00 GHz Installed RAM 16.0 GB (15.8 GB usable) Device ID 61346483-XXXX-XXXX-XXXX-0A8A102FA6DA Product ID 00330-XXXXX-XXXXX-AA634 System type 64-bit operating system, x64-based processor Pen and touch Pen and touch support with 10 touch points
Edition Windows 11 Enterprise Version 21H2 Installed on ‎22/‎04/‎2022 OS build 22000.675 Serial number 0317XXXXX057 Experience Windows Feature Experience Pack 1000.22000.675.0
A lot of the guidance below is taken and adapted from this guide and I always encourage you to read the original documentation as a source of truth to support you alongside my blog.
Enabling Hyper-V & Downloading ISO files
You need to be running Windows Enterprise or Education to be able to support Hyper-V on your device and run virtual machines and almost certainly this is not enabled by default. To turn this on you need to run a PowerShell command (in administrator mode):
With Powershell open, you need to run this command:
This will prompt a restart of your computer to enable the hypervisor in Windows:
You will also need to download the Windows ISO file that will be used to load the operating system onto your virtual machines. You can choose either Windows 10 or Windows 11:
What actually happens is that you download an installer that will help guide you through the process of creating the ISO on your host device. Note, you do not want to upgrade your host PC, you’re wanting to create installation media. So when you run the installer you’ve downloaded it should look like this:
Choose your language and architecture (usually defaults for me):
You may want to create a USB with this if you want to use these ISO on physical machines, but if you’re just interested in creating virtual machines then you select ISO file:
Then choose a location to save these to – I generally create a c:\ISO\ folder and put all the various OS ISO in there:
Creating Virtual Machines In Hyper-V With PowerShell
Now that you’ve got the hypervisor enabled on your host machine and the ISO ready for install, it’s time to create the virtual machines. You can do this via the GUI of the Hyper-V Manager application itself but honestly, it’s quicker to do this from the command line using PowerShell
First of all, you need to determine the name of the network adaptor your host device is using – often there can be multiple, including wired / wireless and a simple PowerShell will determine this:
The next tip is to create a local folder where your VM are going to reside – I typically just use c:\Hyper-V\ and then I run the commands to create the new VM directly in that folder making it easier to know where they exist. To start with, you need to create a new virtual network adaptor for the virtual machines to interface with your host machine network adaptor:
It’s worth noting the name section “-Name HyperV-Wifi” – that name that you choose will need to be referenced when you create the actual VM. With a virtual network adaptor created, you then create the virtual machine with the following code:
I called mine “Win10-OOBE” but this is the name of the VM and you need to keep this consistent in the following commands
-MemoryStartupBytes
I set mine at 4GB – you can assign more, but keep in mind the requirements of your host machine and how much available RAM you have
-BootDevice
VHD – going to use a virtual hard disk that will be defined
-NewVHDPath
This is a common default – making a subfolder in the location where you’re executing the command from (i.e. c:\Hyper-V\ for me)
Note that I have labelled the vhdx file the same as my -Name convention i.e. Win10-OOBE
-NewVHDSizeBytes
Defines the size of the virtual hard disk – I’ve used the default 80GB but it won’t actually take this much at the start – it will grow to that size as a maximum.
-Switch
This defines the virtual network switch that we created earlier – the name must be an exact match
With the VM created, you need to add the relevant ISO to the VM to boot:
Again, note the naming convention “-VMName Win10-OOBE” that needs to match the name of the VM we created above, and the correct path to where we saved the ISO earlier – both need to be exact matches.
You can easily create as many VM as you need using this with simple variable changes – e.g. here is a creation of a Windows 11 VM with a different name, location and ISO, but using the same virtual network switch:
With the VM created, it’s time to turn it on and run through the Out Of Box Experience (OOBE).
Starting Your VM & Installing Windows 10
From within the Hyper-V Manager application you should now see all your VM that you’ve created. By clicking one and then choosing “Connect” you can connect to and start the VM:
One of the key benefits of using virtual machines for testing is that you can take snapshots of a VM at a point in time and then roll back/forward to that snapshot to test something again. I generally take a few snapshots through the setup process so I can start a demo from any point in time that the customer needs to see:
The first snapshot I typically take is when the Windows Setup process starts
One tip when setting these up to choose your correct geographic location under “Time and Currency Format” during this stage of the setup – I choose New Zealand so that the desktop timezone is set once I reach that point.
As these are testing machines, I typically don’t have or use a product key so select that option accordingly:
Then it’s important to choose the correct edition of Windows depending on what you want to test or demo. If you are wanting to use Intune to manage a device you need to choose Windows Pro or Education so it can be joined to AzureAD, but if you’re wanting to demo a “BYOD” device and going to do an AzureAD Register only with Windows Home then you can do that. Typically, I would have a Windows Home and Windows Pro VM for both Windows 10 and Windows 11 to allow me to demo each flavour.
Choose a custom install to wipe everything:
And install into the unallocated drive space:
At which point you’re pretty much done – depending on the speed of your host machine and how much RAM you allocated the virtual machine will determine how long it will take to configure:
At the Windows final OOBE configuration process I take another snapshot as this is a common “starting point” to roll back to show a customer:
After selecting region / keyboard / language / network options I typically create a final snapshot when it’s time to create an account. In the screenshot below this is for a Windows 10 Home Edition creating a local user (you cannot AD/AAD join a Windows Home device remember).
One tip here: Microsoft will drive you down the pathway of using an online Microsoft Account (MSA) to sign into Windows Home Edition rather than creating a local account. This is usually best practice, but for a demo device you likely don’t want to link your personal MSA to it. Therefore, if you temporarily turn off your host device wifi network then the guest VM can’t access the internet, forcing it to create a local user on the device:
Once the user is created, you have the active desktop and that’s the final snapshot I take during the setup process:
Windows 11 Considerations
There are a couple of considerations to keep in mind for Windows 11 in terms of your VM settings, specifically the number of virtual cores allocated and the TPM security settings.
You need a minimum of 4 virtual processors:
You also need the TPM enabled under security settings
Aside from that, the process is very similar to Windows 10 and you can see the flow below, although I use Windows 11 Pro and therefore have the option to add a work or school account and complete the AzureAD Join through the OOBE experience:
Again, it’s good practice to create snapshots along the way. I typically always snapshot at the “Add work or school account” stage as this is a common “roll back” point if I’m re-enrolling a device into Intune:
To complete the AzureAD Join make sure you select “Setup for Work or School”- note, you must have an internet connection for this option to be available. No internet, you’re going down the personal use and local user route:
This is where you can sign in with your school email address – provided the user has suitable licensing (AzureAD Premium 1 or 2 and Intune) then you’re going to enjoy a seamless experience:
With a password entered correctly you’re going to enjoy a short wait whilst configuration happens:
And within a minute or two you’re going to have an active desktop – note that in the background you can already see the Chrome Browser has been installed by Intune via an MSI package and added to the desktop shortcuts. This is a logical place to take a final snapshot:
If you want to check that the AzureAD Join has completed successfully you can do this under Settings -> Accounts -> Access Work or School
By clicking the “Info” button under the username, you’ll see what the MDM is managing and the last time a sync was attempted/successful:
Configuring For Windows AutoPilot
If you’re not familiar with Windows AutoPilot, it’s essentially a device registration service that allows for the collection of a unique hardware hash/identifier for a device and having that added/registered to your M365 Tenant allowing for zero touch onboarding. In some markets, a reseller/distributor can add these hardware identifiers to your tenant at the time of sale, or an IT admin can do it manually. There are a few ways to collect this hardware hash, but the easiest way in my mind in a VM environment is to use a PowerShell command during the OOBE setup.
Once you’ve completed the Windows Setup and hit the OOBE stage, then hit “Shift + F10” to launch the command line:
The following commands come from this GitHub repository and work at time of publishing – note, those with a # in front of them are inline “comments” you don’t need to use these, just run the commands sequentially under each comment:
# At the OOBE, open a command prompt session. Shift F10
# Launch PowerShell
Powershell.exe
# Set PowerShell Execution Policy
Set-ExecutionPolicy bypass
# Install the AutoPilot Script
install-script get-windowsautopilotinfo
# Run the Get Windows AutoPilot Info Command
Get-WindowsAutoPilotInfo.ps1 -online
# Login with Azure AD credentials when prompted
Here is a view of me adding the WindowsAutoPilotInfo script – note you do need to approve the adding of NuGet to get this to work:
Once you run the actual script it will pop open the familiar O365 authentication window and this needs to be authenticated with a Global Admin:
At that point, the script will harvest the unique hardware hash of your virtual machine and automatically upload it to Endpoint Manager’s enrolled devices list– there is no need to do any manual uploading of CSV files etc – this is a fantastic time saver.
Additionally, because the OOBE has not completed, Windows has not finished the install, you can simply reboot the virtual machine to kickoff the AutoPilot deployment. Before you do that, however, you may want to check the hardware hash has registered in Endpoint manager, so the place to check in the Admin Console is here, and it should look like this:
You can see that the serial number in Endpoint Manager matches the serial number identified in the PowerShell script above.
To configure AutoPilot to work in a zero touch ecosystem there are a few steps, basically:
Import the device hardware has (already done above)
Create a device group for the AutoPilot devices – guide
Note: one tip is you can create a dynamic group in AzureAD that will automatically detect AutoPilot devices and put them into a group. This streamlines things even further. The query to identify and add AutoPilot devices to a dynamic group is:
Configure the Deployment Profile (this is what streamlines the set up for the end user by removing a lot of options/choices) – configure in Admin Console here:
Because I was running the dynamic group query to automatically add AutoPilot devices to this group, you can see the new device I registered above show up in this under “Assigned Devices” in the group:
Finally, to test the Windows AutoPilot zero touch deployment simply turn on (or reboot) the VM that you harvested the unique hardware hash from and depending on the settings you selected in the Deployment Profile you assigned above it should jump straight to the sign in screen:
Note in the above screenshot how it’s showing my school logo and also the customised message for IT help if required – this is the first screen the end user would see once the device has turned on and connected to the internet in the OOBE – they simply need to enter their email address and password to complete the AzureAD Join and Intune enrollment.
Final Thoughts
With this process, you can quickly create a virtual testing environment for various versions and editions of Windows and also leverage AutoPilot for testing purposes. It’s pretty straight forward to get up and running and in a future post I’ll show how to configure Intune to manage different settings and then use the Hyper-V snapshots to roll back and forward in testing.
Hope this helps – any questions or improvements on how you do things let me know in the comments below!